5. Copier
35
Proof set feature
To make 1 set of collate copy first, set the original and
enter necessary settings for collate copy (step 2 to 3 on
“5.2.2 Collate copy”, page 34). Press {V} or {^}
repeatedly to display “PROOF SET” (step 4 on
“5.2.2 Collate copy”, page 34). The unit will make 1 set of
collate copy and stop temporarily so you can check
whether the copy is made as you expected. If the copy is
correct, press {Start} to continue copying.
If the copy is not correct, press {Stop} and start again
from the beginning.
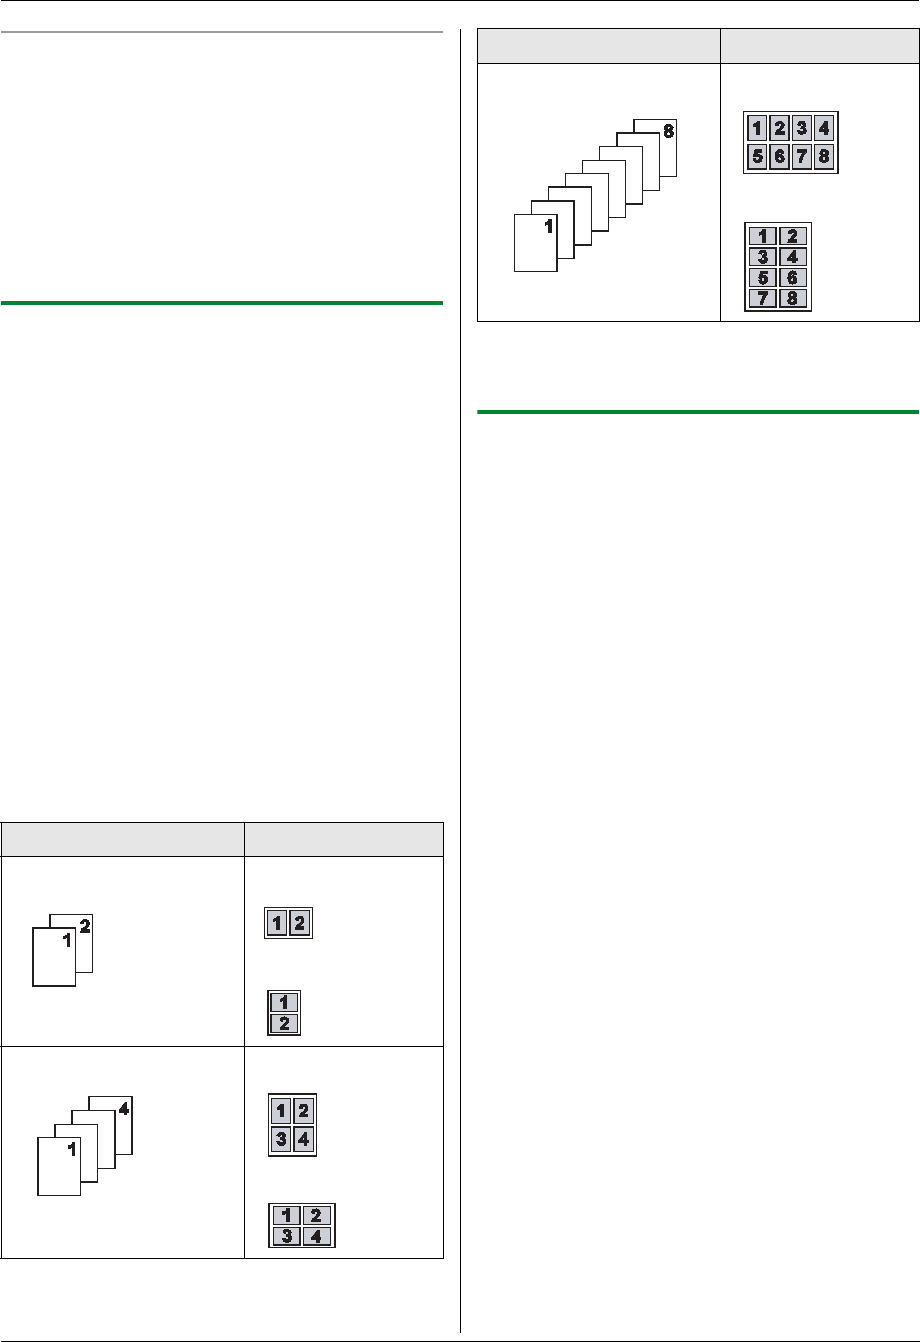
5.2.3 N in 1 feature
You can save paper by copying 2, 4 or 8 pages onto 1
page. The documents will be reduced to fit the recording
paper.
1 Set the original (page 19).
L To make a portrait copy, set the original in portrait
direction. To make a landscape copy, set the
original in landscape direction.
2 {Enhanced Copy}
3 Press {<} or {>} repeatedly to select “N in 1”. i
{Set}
4 Press {V} or {^} repeatedly to select the number of
original documents from “2 in 1”, “4 in 1” or “8
in 1”. i {Set}
5 Press {V} or {^} repeatedly to select the layout from
“PORTRAIT” or “LANDSCAPE”. i {Set}
6 If necessary, enter the number of copies (up to 99).
i {Start}
7 After you finish copying, press {Stop} to reset this
feature.
Note:
L You can save the previous N in 1 setting (feature
#467 on page 56).
5.2.4 Copy reservation
You can reserve your copy;
– while the unit is printing documents from your
computer.
– while the unit is printing received fax documents.
1 Set the original (page 19).
2 While “PC PRINTING” or “PRINTING” is displayed,
press {Copy}.
3 Make necessary settings such as number of copies,
resolution, zoom features and N in 1 features. i
{Start}
L “COPY RESERVED” will be displayed. The unit
will start copying after the current printing job.
Original document Page layout
“2 in 1”“PORTRAIT”
“LANDSCAPE”
“4 in 1”“PORTRAIT”
“LANDSCAPE”
“8 in 1”“PORTRAIT”
“LANDSCAPE”
Original document Page layout


