


Removal and replacement procedures 27
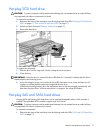
Hot-plug SCSI hard drive
CAUTION: To prevent improper cooling and thermal damage, do not operate the server unless all bays
are populated with either a component or a blank.
To remove the component:
1. Determine the status of the hard drive from the hot-plug hard drive LEDs ("Hot-plug SCSI hard drive
LEDs" on page 55, "SAS and SATA hard drive LEDs" on page 57).
2. Unlock and open the bezel ("Remove the bezel" on page 25).
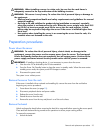
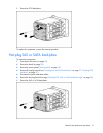
3. Remove the hard drive.
To replace the component:
1. Slide the drive into the cage until it clicks, locking the drive into place.
2. Close the lever.
IMPORTANT: When the drive is inserted, the drive LEDs flash for 2 seconds to indicate that the drive is
seated properly and receiving power.
3. As the drive begins to spin, be sure that the drive LEDs illuminate one at a time and then turn off
together to indicate that the system has recognized the new drive.
In fault-tolerant configurations, allow the replacement drive to be reconstructed automatically with
data from the other drives. While reconstruction is in progress, the online LED flashes.
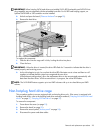
Hot-plug SAS and SATA hard drives
Hot-plug SATA and hot-plug SAS hard drives can be used interchangeably when a SAS controller is
installed. The embedded SATA controller supports only SATA drives.
CAUTION: To prevent improper cooling and thermal damage, do not operate the server unless all bays
are populated with either a component or a blank.
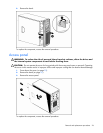
To remove the component:
1. Determine the status of the hard drive from the hot-plug hard drive LEDs ("SAS and SATA hard drive
LEDs" on page 57).