Page 2 Page 3
Powering Your Recorder
You can power the recorder in one of three ways.
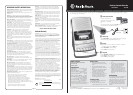
Batteries
Open the battery compartment and
install four C batteries (not included)
matching the polarity symbols (+/-).
AC Power
Connect the supplied power cord
to the AC IN jack on the side of the
recorder and connect the other end
to a standard AC outlet. Do not force
the connections, as they only fit one
way.
Plug the power cord into the AC IN
jack before plugging it into the AC
outlet, and unplug the power cord
from the AC outlet before unplugging
it from the AC IN jack.
Vehicle Battery Power
You can power the recorder from your vehicle’s cigarette-
lighter socket using a 6V, 300mA DC adapter and a size B
Adapta-plug™ adapter (neither included; available at your
local RadioShack store). Unplug the adapter from the outlet
before unplugging it from the recorder.
Note: The power source must supply 6V DC and deliver at
least 300mA. Its center tip must be set to positive and its
plug must fit the DC 6V jack. Using an adapter that does
not meet these specifications could damage the recorder or
adapter.
Playing a Cassette
Load the cassette with the side to play facing out, and press
PLAY. The tape will automatically stop when it reaches the
end, or you can press STOP/EJECT.
If the playback sounds distorted, clean the recorder with a
cassette deck cleaning kit (not included).
Recording
1. Prepare the source:
• Built-in microphone – Place the recorder within 2 to 3
feet of the sound source and set VOX to OFF.
• External microphone – Insert the microphone plug into
the MIC jack. If the microphone has a remote control
plug, connect it to the REM jack.
• Audio source – Connect the audio source to the AUX
jack using a mono patch cord (not included) and set the
audio source’s volume to the desired level.
• VOX Recording – Set VOX to ON. This records only
when there is sound to save power and prevent blank
sections of tape. Adjust VOLUME/VOX SENS to set the
sound level at which recording begins. Rotate VOLUME/
VOX SENS to adjust the VOX sensitivity. The higher the
VOX sensitivity, the lower the sound level is needed to
start VOX recording.
2. Press STOP/EJECT to load a blank tape, or one you
want to record over.
3. Press RECORD. Both PLAY and RECORD lock down and
recording begins.
• Do not force down RECORD if the tape’s erase-
protection tabs have been removed, or you will damage
the recorder.
• The recorder automatically sets the recording level. The
volume setting does not control the recording volume.
4. Press STOP/EJECT to stop recording. Recording stops
automatically when the tape ends.
Erasing Tapes
To record over a cassette tape, simply record as usual. The
cassette deck records over the previous recording.
You can quickly erase both sides of a cassette tape using a
RadioShack bulk tape eraser (not included).
Note: If you use metal or high-bias type tape, the recorded
sound might not be erased properly.
Care and Maintenance
• Keep the recorder dry. If it gets wet, wipe it dry
immediately.
• Use and store the recorder only in normal temperature
environments.
• Keep the recorder away from dust and dirt, and handle
the recorder gently and carefully.
• Modifying or tampering with the recorder’s internal
components can cause a malfunction and might
invalidate its warranty. If your recorder is not performing
as it should, take it to your local RadioShack store for
assistance.
Tape Tips
Recommended Tapes
Tape quality greatly affects the quality of the recording. We
recommend extended range or low noise Type 1 regular
length (60- or 90-minute) normal-bias cassette tapes. We
do not recommend long-play cassette tapes such as C-120s
because they are thin and can easily tangle.
Restoring Tape Tension and Sound Quality
After you play a cassette tape several times, the tape might
become tightly wound on the reels. This can cause playback
sound quality to deteriorate.
To restore the sound quality, fast forward the tape from the
beginning to the end of one side, then completely rewind it.
Then loosen the tape reels by gently tapping each edge of
the cassette on a flat surface.
Caution: Be careful not to damage the cassette when
tapping it. Do not touch the exposed tape or allow any
sharp objects near the cassette.
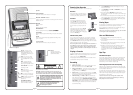
Speaker
TAPE COUNTER
Helps to find the specific location on the tape.
Built-in microphone
PAUSE
Press once to temporarily stop playback/recording. Press
again to resume.
REWIND/FAST-F
Press to rapidly wind the tape backward or forward.backward or forward.or forward.or forward.forward.
RECORD
Press to record.
PLAY
Press to play the cassette.
STOP/EJECT
Press to stop the playback/recording and open the cassette
door.
RECORD / BATTERY Indicator
Lights to confirm the recorder is recording and dims when the
batteries are low.
Carrying Handle
Slide out the handle out to carry the recorder.
AC IN
Power Cord
AUX – Connect an audio
source using a patch cord
(not included) with a
1
/8 -inch
plug.
DC 6V – Connect a 6V,
300mA DC adapter and a
size B Adapta-plug™ (not
included) to connect to your
vehicle power.
EAR – Insert earphones
(not supplied) for private
listening. The speaker mutes.
MIC – Insert a microphone’s
1
/8 -inch plug (not included)
VOX ON/OFF – Turn VOX
recording on/off.
VOLUME/VOX SENS –
Rotate to adjust the volume
level and VOX sensitivity.
TONE – Rotate to customize
the sound to personal
preference.
AC IN
Connect your power
adapter to operate with
standard AC outlet.
WARNING: 7RUHGXFHWKHULVNRI¿UHRUVKRFNKD]DUGGRQRWH[SRVH
WKLVSURGXFWWRUDLQRUPRLVWXUH
CAUTION725('8&(7+(5,6.2)(/(&75,&6+2&.'2
1275(029(7+(&29(525%$&.1286(56(59,&($%/(
3$576,16,'(5()(56(59,&,1*7248$/,),('3(56211(/
!
CAUTION
RISK OF ELECTRIC SHOCK
DO NOT OPEN
The lightning symbol is intended to alert you to
the
presence of uninsulated, dangerous voltage within
WKLVSURGXFW¶VHQFORVXUHWKDWPLJKWEHRIVXI¿FLHQW
magnitude to constitute a risk of electric shock. Do
not open the product’s case.
The exclamation symbol is intended to inform
you that important operating and maintenance
instructions are included in the literature
accompanying this product.
!
REM – Connect a
microphone remote control
with
1
/10 -inch plug.