8-outlet Power Manager with Surge
Protection and Noise Filtering
RF-HTS120
QUICK SETUP GUIDE
Congratulations on your purchase of this Rocketsh Power Manager
with surge protection and noise ltering.
Your power manager:
• Reduces energy consumption to save environmental resources
and lower your electric bill
• Provides surge protection for sensitive electronic devices
• Incorporates noise ltering to provide "clean" power that will
maximize the performance of your devices
Features
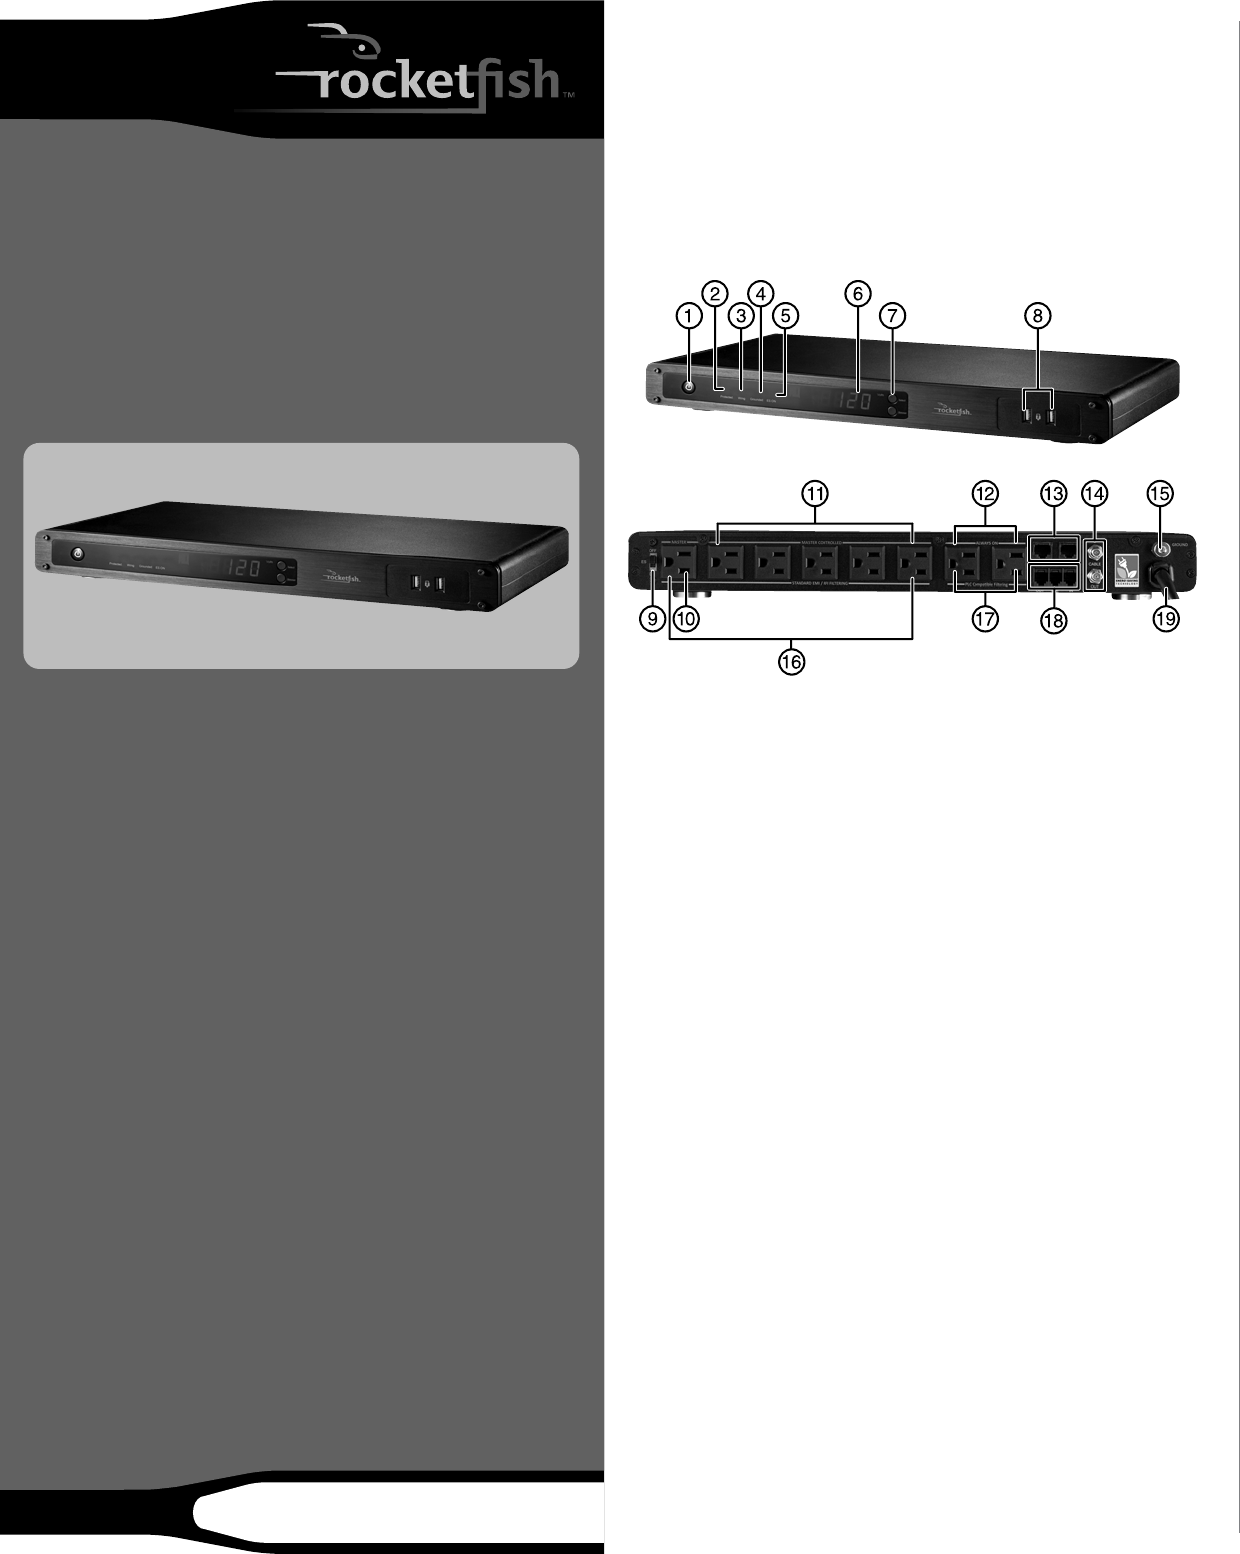
Front
Back
1 Main power switch/circuit breaker – controls power to all AC
outlets on the Power Manager, and allows the unit to be reset in
the event of a circuit overload (after the overload condition has
been resolved).
2 Protected LED indicator – lights when the surge protection
feature is working properly. If this LED does not light or goes
out, the surge protection feature has reached full capacity and
can no longer absorb additional surges and spikes. The power
manager should be replaced if this light goes out.
3 Wiring LED indicator – lights to indicate that the Line and
Neutral leads to the AC outlet with which the power manager is
plugged into are properly wired. If this LED does not light, we
recommend that you contact a certied, licensed electrician to
inspect your wiring.
4 Grounded LED indicator – lights when a properly grounded AC
outlet is detected. If this LED does not light, we recommend that
you contact a certied, licensed electrician to inspect your
wiring.
5 ES On LED indicator – lights when the power manager is set to
the Energy Saving mode.
6 LED information panel – keeps you informed of incoming
voltage level (volts), current draw of connected equipment
(amps) and total power consumption (watts).
7 LED panel controls – allow you to toggle through the
information provided by the display, as well as dim the
brightness of the display.
8 USB power ports – two front panel USB power ports for
conveniently powering/charging mobile USB devices, such as
MP3 players, cell/smart phones, etc.
9 ES (Energy Saving) On/O switch – allows you to turn the
master/master-controlled feature on and o. When set to the
ON position, the master outlet will control power to the
master-controlled outlets. When set to the OFF position, all
eight outlets will function as Always-on outlets.
10 One master outlet – controls power to the ve
master-controlled outlets.
11 Five master-controlled outlets – automatically shut down to
conserve energy when the device plugged into the master
outlet is turned o (only with the ES On/O switch is set to the
ON position).
12 Two always-on outlets – provide continuous power regardless
of Master/Master-controlled outlets state.
13 Network line surge protection – protects your incoming
Ethernet (RJ45) line from surges and spikes.
14 Coaxial cable surge protection – protects your incoming
coaxial cable line from surges and spikes.
15 Ground post – use to provide a ground to non-grounded
devices, such as turntables.
16 Standard EMI/RFI noise ltering – six outlets are designed
with standard EMI/RFI noise ltering (do not plug Powerline
devices into these outlets as the ltering could negatively
impact network performance).
17 PLC Compatible noise ltering - two outlets are designed with
PLC Compatible noise ltering, allowing Powerline networking
devices to be plugged into these outlets with no negative eect
on network performance.
18 Phone line surge protection – protects your incoming phone
(RJ11) line from surges and spikes; also serves as a 1-in/2-out
line splitter.
19 8 ft (2.4 m) Soft-Flex™ power cord with right-angle/o-set
plug – enables placement of the Power Manager in the desired
location, furniture to be placed as close as possible to the wall
and will not block the second AC outlet.
• Console design – made to t conveniently in a stack of home
theater components.
• 4,650 joules surge protection – protects your equipment from
damaging power surges and spikes.
• 80 dB EMI/RFI noise ltering – ensures that your equipment
receives only clean power for maximum performance.
• Audible alarm – sounds when the surge protection feature has
reached full capacity and can no longer absorb surges and spikes.
The power manager should be replaced if this alarm sounds.
• Power cord labels – attach these labels to your power cords
(near the plug end) to help identify which cord is attached to
which device in the event that one should need to be
unplugged for any reason. The labels are pre-printed for
convenience, and the blank labels can be customized for unique
devices.
Operating instructions
1 Plug the power cord of the Rocketsh Power Manager into a
standard 120V AC outlet. If the LEDs do not light up, press the
main power switch/circuit breaker on the front of the unit.
2 Plug the power cord of your primary home theater device, such
as a TV, into the Master outlet of the Power Manager. When this
device is powered o or goes into a SLEEP or STANDBY mode,
power to the devices plugged into the Master-controlled outlets
will automatically be shut o, saving energy by preventing
them from drawing any standby current.
3 Plug the power cords of your secondary devices, such as a
Blu-ray/DVD player, A/V receiver, CD player, etc., into the
Master-controlled outlets of the Power Manager.
Note: Do not plug any device into a Master-controlled outlet
that you wish to use while the power of the primary device
plugged into the Master outlet is powered o, as these outlets
only provide power to the connected devices while the primary
device is powered on.
