


Using Your Printer with a Macintosh
33
7 Using Your Printer with
a Macintosh
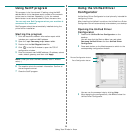
Your printer supports Macintosh systems with a built-in USB
interface or 10/100 Base-TX network interface card. When you
print a file from a Macintosh computer, you can use the CUPS driver
by installing the PPD file.
N
OTE
:
Some printers do not support a network
interface. Make sure that your printer supports a
network interface by referring to Printer Specifications
in your Printer User’s Guide.
This chapter includes:
• Installing Software
• Using SetIP program
• Setting Up the Printer
•Printing
Installing Software
The CD-ROM that came with your printer provides you with the
PPD file that allows you to use the CUPS driver or Apple
LaserWriter driver
(only available when you use a printer
which supports the PostScript driver)
, for printing on a
Macintosh computer.
Printer driver
Installing the Printer driver
1
Make sure that you connect your printer to the computer.
Turn on your computer and printer.
2
Insert the CD-ROM which came with your printer into the
CD-ROM drive.
3
Double-click
CD-ROM icon
that appears on your
Macintosh desktop.
4
Double-click the
MAC_Installer
folder.
5
Double-click the
MAC_Printer
folder.
6
Double-click the
Samsung SPLC Installer
icon.
7
Enter the password and click
OK
.
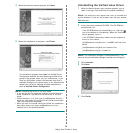
8
The Samsung SPL Installer window opens. Click
Continue
and then click
Continue
.
9
Select
Easy Install
and click
Install
.
10
After the installation is finished, click
Quit
.
Uninstalling the Printer driver
Uninstall is required if you are upgrading the software, or if
installation fails.
1
Insert the CD-ROM which came with your printer into the
CD-ROM drive.
2
Double-click
CD-ROM icon
that appears on your
Macintosh desktop.
3
Double-click the
MAC_Installer
folder.
4
Double-click the
MAC_Printer
folder.
5
Double-click the
Samsung SPLC Installer
icon.
6
Enter the password and click
OK
.
7
The Samsung SPL Installer window opens. Click
Continue
and then click
Continue
.
8
Select
Uninstall
and then click
Uninstall
.
9
When the uninstallation is done, click
Quit
.