DB35.2 Series Serial ATA Installation Guide
ST3500841SCE, ST3300822SCE, ST3200827SCE, ST3160212SCE,
ST3120213SCE and ST3802110SCE
Serial ATA (SATA) Interface Disc Drives
Publication Number: 100390004, Rev. A, Seprember 2006
Serial ATA interface disc drives are designed for easy installation. It is nor-
mally not necessary to set any jumpers, terminators, or other settings on
this drive for proper operation.
With a Serial ATA (SATA) interface, each disc drive has its own cable that
connects directly to a Serial ATA host adapter or a Serial ATA port on your
motherboard. Unlike Parallel ATA, there is no master-slave relationship
between drives that use a Serial ATA interface.
You can use a Serial ATA drive in the same system with Parallel ATA drives
as long as both interfaces are supported on the motherboard or with a host
adapter. This makes it easy to add Serial ATA capability to your existing
system without removing existing Parallel ATA disc drives.
What you need
• A Phillips screwdriver and four 6-32 UNC drive mounting screws.
• A SATA interface cable (sold separately). Maximum length is 39 inches
(1 meter).
• A SATA-compatible power cable or adapter (sold separately).
• A system with a SATA connector on it, or a SATA host adapter and avail-
able PCI slot in which to install the adapter.
Refer to your computer system documentation to see if your system sup-
ports SATA on the motherboard and locate the SATA connector. If your
system does not have a SATA connector on the motherboard, you must
purchase a SATA host adapter that is compatible with your computer and
operating system and install it with the appropriate device driver according
to the host adapter manufacturer’s installation instructions.
Note. See www.seagate.com/support/disc/sata/
for a list of companies
that sell SATA components.
Handling precautions/electrostatic discharge protection
• Disc drives are fragile. Do not drop or jar the drive. Handle the drive only
by the edges or frame.
• Drive electronics are extremely sensitive to static electricity. While
installing the drive, wear a wrist strap and cable connected to ground.
• Turn off the power to the host system during installation.
• Do not disassemble the drive. Doing so voids the warranty. See the
Warranty information on page 2.
• Do not apply pressure or attach labels to the circuit board or to the top of
the drive.
The easiest way to install your drive in a Windows system
To successfully install and obtain the maximum capacity from the drive,
use DiscWizard for Windows disc drive installation software utility. This util-
ity is available exclusively from Seagate. You can download this free disc
drive installation software from our web site at www.sea
gate.com/support
or run the program directly from your web browser.
Note. Older versions of DiscWizard do not recognize Serial ATA model
numbers. Make sure that you use DiscWizard for Windows or later
when installing a DB35® Series Serial ATA disc drive.
To run DiscWizard:
Follow the instructions on the download page at www.sea
gate.com to cre-
ate a diskette and complete the installation.
If you cannot run DiscWizard, follow the instructions on this installation
sheet to install and configure your drive.
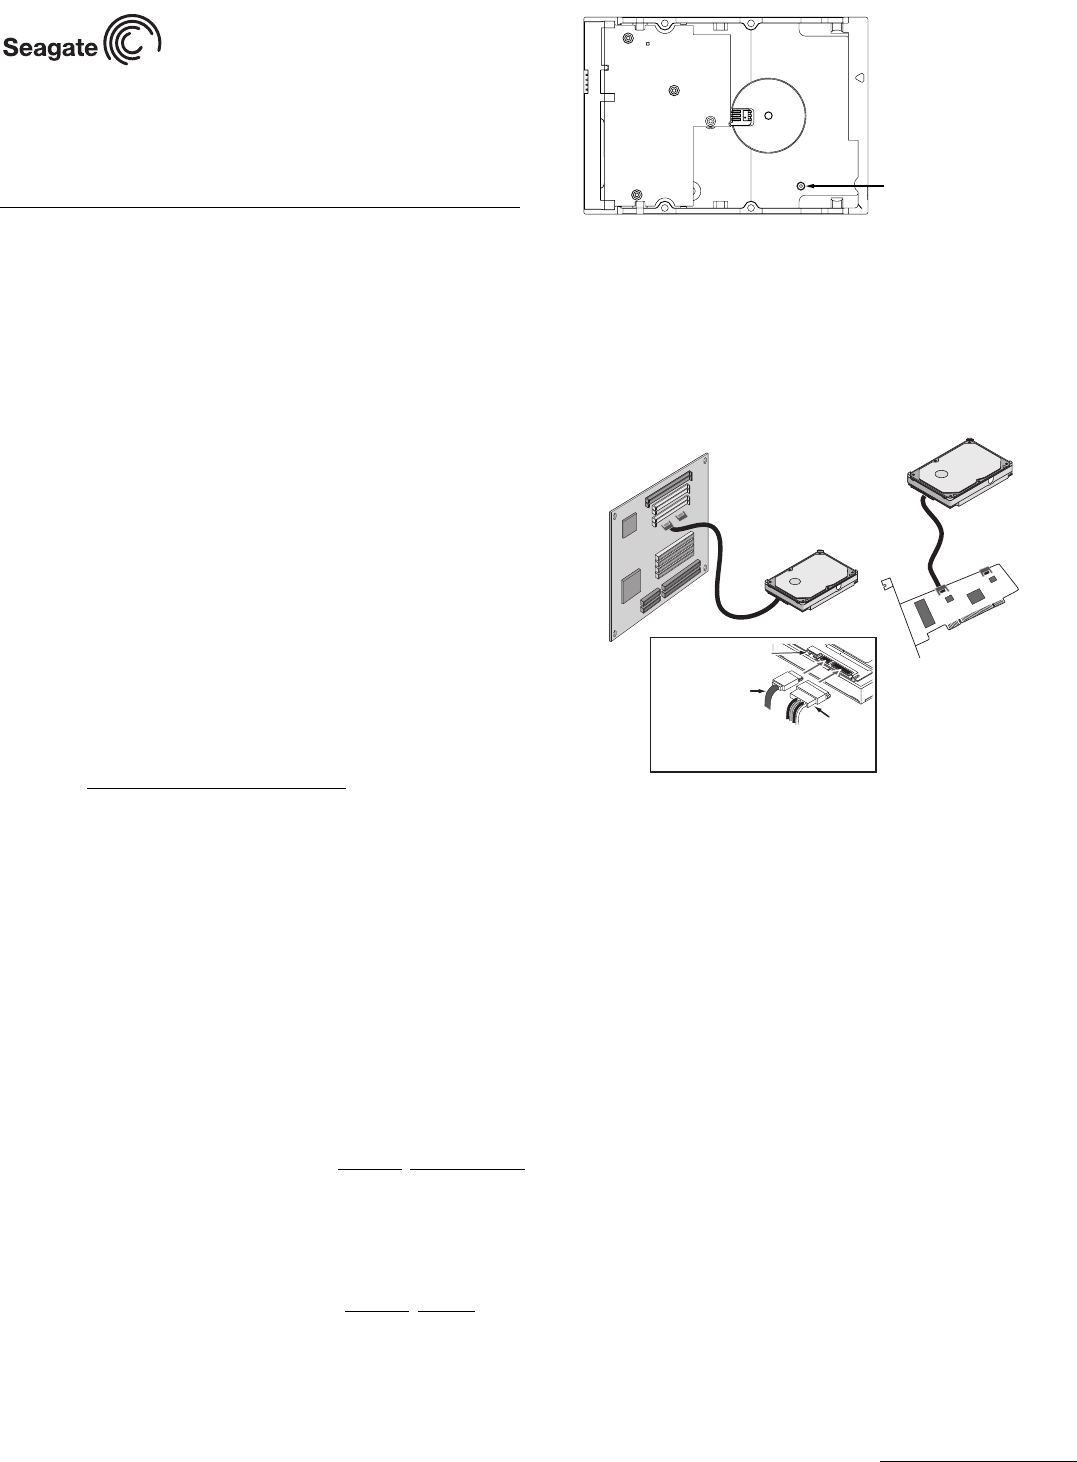
Breather filter hole precaution
Caution. Do not cover, seal, or insert any object into this hole. If this hole
is covered, sealed, or penetrated by any object, the drive reliabil-
ity may be compromised and could lead to permanent damage
and voids the warranty.
Attaching cables and mounting the drive
1. Attach one end of the drive interface cable to the SATA interface con-
nector on your computer’s motherboard or SATA host adapter (see
your computer manual for connector locations).
Note. Serial ATA connectors are keyed to ensure correct orientation.
2. Attach the interface and power cables to the drive.
3. Secure the drive using four 6-32 UNC mounting screws in either the
side-mounting or bottom-mounting holes. Insert the screws no more
than 0.20 inches (5.08 mm) into the bottom-mounting holes and no
more than 0.14 inches (3.55 mm) into the side-mounting holes.
Note. Do not overtighten the screws or use metric screws. This may dam-
age the drive.
Configuring the BIOS
Close your computer case and restart your computer. Your computer may
automatically detect your new drive. If your computer does not automati-
cally detect your new drive, follow the steps below.
1. Restart your computer. While the computer restarts, run the system
setup program (sometimes called BIOS or CMOS setup). This is usu-
ally done by pressing a special key, such as DELETE, ESC, or F1 dur-
ing the startup process. See your system documentation for details
about your particular system.
2. Within the system setup program, instruct the system to auto detect
your new drive.
3. Save the settings and exit the setup program.
When your computer restarts, it should recognize your new drive. If your
system still doesn’t recognize your new drive, see the troubleshooting sec-
tion on the back of this sheet.
Note. Some systems may see the drive and classify it as a SCSI device.
This is normal even though this is not a SCSI disc drive. This does
not affect performance or capacity.
Microsoft operating system installation instructions
For detailed information about installing a Microsoft operating system on
your new Seagate drive, refer to the Microsoft Knowledgebase Article ref-
erences below. To locate an article, go to http://support.microsoft.com
and
enter the article number in any search box on the Microsoft web site. For
Breather Hole
Do not cover
or seal.
Each drive requires its own cable.
Note:
Attach the SATA interface
cable to the motherboard
or SATA host adapter
power
adapter
cable
Note: The drive is inverted in this
illustration to show the connectors.
SATA
Interface cable
Jumper block
(for troubleshooting)


