


10 Hawk 2XL Family Installation Guide, Rev. C
_______________________________________________________________________________________________________________________
Drive configuration
You can easily install your new Seagate disc drive as your first
ever hard drive, a replacement or as a second drive in a com-
puter system with an existing hard disc drive.
Installation involves the following steps:
• Drive configuration
• Mounting
• Informing the computer about your drive and how you want it
divided into partitions.
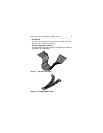
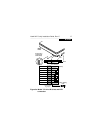
Before you physically mount your new disc drive in your com-
puter, you need to check the jumper plug settings that deter-
mine how the drive operates. Refer to Table 1 to find the Figure
specified applicable to your model drive for the particular con-
figuration functions of interest. Note that there are some con-
nector pins sticking out from the drive's printed circuit board
(PCB) that are labeled J2 and J6 (called "jumper plug head-
ers").
Model "W" additionally has J1-Auxiliary. Some systems may
have a cable connected to J1-Auxiliary that allows remote set-
ting of drive ID by switches or within the computer logic. It also
provides a connection to a remote drive activity LED. Jumpers
may be used on J1-Auxiliary.
Note the small jumper plugs connected across pairs of pins in
some places on these connectors (Figures 3a through 3e show
these jumper plugs enlarged).