


62
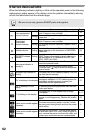
STATUS INDICATORS
When the following indicators light up or blink on the operation panel or the following
alphanumeric codes appear in the display, solve the problem immediately referring
to both the table below and the relevant page.
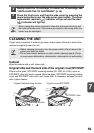
Be sure to use only genuine SHARP parts and supplies.
Indication Cause and remedy Page
Drum replacement
required indicator
Steadily
lit
Replacement of drum cartridge will be needed
soon. Prepare a new cartridge.
70
Blinking
Drum cartridge must be replaced. Replace it with
a new one.
58
TD cartridge
replacement
required indicator
Steadily
lit
Replacement of TD cartridge will be needed
soon. Prepare a new cartridge.
70
Blinking
TD cartridge must be replaced. Replace it with a
new one.
57
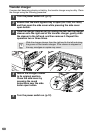
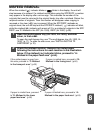
Misfeed indicator Blinking
A misfeed has occurred. Remove the misfed
paper referring to the description of "MISFEED
REMOVAL".
63
SPF/RSPF misfeed
indicator
Blinking
An original misfeed has occurred in the SPF/
RSPF. Remove the misfed originals referring to
the description of "E: Misfeed in the SPF (AL-
1553), RSPF (AL1555)".
66
Power save indicator is
steadily lit.
The unit is in the preheat mode. Press any key to
cancel the preheat mode.
54
The unit is in the auto power shut-off mode.
Press the start ( ) key to cancel the auto power
shut-off mode.
54
The paper tray indicator is
blinking.
The paper tray is not installed properly. Push the
tray into the unit securely.
–
"CH" is blinking in the display.
The TD cartridge is not installed. Check if the
cartridge is installed. If "CH" is blinking even if a
cartridge is installed properly, contact your
authorised service representative.
57
"CH" is steadily lit in the
display.
Side cover is open. Close the side cover securely
by pressing the round projections near the side
cover open button.
–
"P" is blinking in the display.
The paper tray or multi-bypass tray is empty.
Load paper.
15, 17
A misfeed has occurred in the paper tray, single
bypass or multi-bypass tray. Remove the misfed
paper.
63
A letter and a number appear
alternately.
The scan head locking switch is locked. Unlock
the scan head locking switch and turn the power
switch off/on.
9
A letter and a number appear
alternately.
The unit will not function. Turn the power switch
off and then switch it on, and if there is again an
error, remove the power cord from the outlet, and
contact your authorized service representative.
–