


Sharp AR-C265P User’s Guide
240
Mac OS X
1. Choose [File] → [Print].
2. From the [Printer] menu, select your printer model.
3. Select [Printer Features].
4. From the [Feature Sets] menu, [Color Options].
5. From the [color Mode] menu, select [Graphic Pro].
6. From the [Feature Sets] menu, select [color – Graphic
Pro 1].
7. From the [color Matching Task] menu, select [Printer
Simulation].
If you wish to produce black and grey colors that are
printed using only black toner, enable the [Preserve
Black] option. Although this produces a better quality
print, the black and grey colors will not be simulated
accurately.
8. From the [Feature Sets] menu, select [color – Graphic
Pro 2].
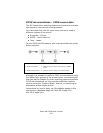
9. From the [RGB Profile source], select the ICC profile that
corresponds to the device you are trying to match such
as your monitor, scanner or digital camera.
Remember that the names “RGB Source 1”, “RGB
Source 2” and so on relate to the number assigned to the
profile using Profile Assistant. See “Using Profile
Assistant” on page 231.
10. From the [Simulation Target Profile] menu, select the
profile of the device you wish to simulate.
Remember that the names “CMYK Source 1”, “CMYK
Source 2” and so on relate to the number assigned to the
profile using Profile Assistant. See “Using Profile
Assistant” on page 231.
11. From the [Feature Sets] menu, select [color – Graphic
Pro 3].
12. From the [Printer Output Profile] menu, select your
printer profile.
If [Auto] is selected, the factory default profiles that are
embedded in the printer will be used. If you have created
a printer profile yourself using profile creation software,
select it here and choose a rendering intent.