


User’s Guide 4-13
Paper Tab
Windows Operations
Job Offset
The Offset Catch Tray can place sheets in alternate positions to separate one print job from
another. This is called job offsetting. When selected, the output position changes after the final
sheet of the print job is printed. The next job is offset (shifted a bit) to keep it separate from the
previous print job. The Offset Catch Tray must be installed to use this option. Once installed,
this feature is enabled by default.
To disable Job Offset through your Printer Properties:
1. Select the Main tab within your Printer Properties.
2. Select No Offset in the Finishing area
3. Click OK.
Paper Tab
Source
You can select the input tray from which paper is used to print the job.
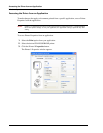
To select the paper source through your Printer Properties:
1. Select the desired tray from the Paper Source pulldown in the Paper tab within your
Printer Properties.
Automatically Select will choose and available tray.
2. Click OK.
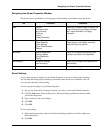
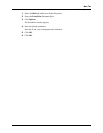
Printing on Special Paper
The printer can accommodate a variety of special paper such as Transparencies, Envelopes,
Labels, Index cards, and Postcards. Each paper type requires some special handling. Prior to
inserting the paper into the tray, read the sections in “Paper Types” on page 2-6 for each special
paper type.
Settings in the Operator Panel and in your Printer Properties are required to specify the special
paper loaded in the specified tray. Paper type settings must match those of the actual paper
loaded in the trays. Otherwise, image quality cannot be processed accurately. Toner may not
fuse properly on the paper, resulting in dirty and poor quality printouts.
To select the special paper types through your Printer Properties:
1. Change media size at Operator Panel via the loaded tray’s Paper Menu’s Media size
selection or using the EWS.
2. Select the Paper Type from the pulldown in the Paper tab within your Printer Properties.
3. Ensure that the Paper Source is set to a paper tray that is loaded with the required paper.
4. Click OK.