


7-2 User’s Guide
Configuring the Driver
Networking
Setting the Network Configuration Manually
You can make changes to the printer’s default network configuration using the Operator Panel.
Once the settings for DHCP or IP address are changed, the printer automatically re-initializes.
To manually set the printer’s IP address:
1. Navigate through the menus to the Interface> Network 1 Setup sub menu.
2. Navigate through the Network 1 Setup items to set all of the following items:
IP Address
Subnet mask
Disable DHCP
For more information, see “Interface Menu” on page 3-8.
Setting the IP Address through the Embedded Web Server
The IP Address can also be changed from a computer by using the Embedded Web Server. Prior
to using the Embedded Web Server, the printer must have a obtained a valid IP address either
through DHCP or manually entered through the Operator Panel.
1. Connect your printer to the network by plugging in the network connector.
2. Turn on your computer and allow it to power up.
3. Print the Configuration Summary by pressing the INFO button. The Configuration
Summary lists the printer’s IP address.
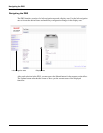
4. Access the EWS as described in “Accessing the EWS” on page 6-1.
5. In the left navigation area, select Network Settings>Protocol Settings and navigate
through the options to get the IP address.
NOTE: You must have administrative access to perform this function.
Configuring the Driver
Once the printer has an IP address, the printer driver can be installed.
1. Connect your printer to the network by plugging in the network connector.
2. Turn on your computer and allow it to power up.
3. Print the Configuration Summary by pressing the INFO button. The Configuration
Summary lists the printer’s IP address.
4. Install the printer drivers using the CD-ROM included with the printer.
5. At the Select a Printer Port installation screen, click the Add Network Port button.
6. Enter the printer’s IP address and complete the installation as indicated by the installation
screens.