


26
E
Menu Items
n
OPTION
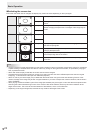
DATE/TIME SETTING
Set the date and time. Press
or
to select the date
and time, and press
or
to change the numerical
values.
Setthedatein“Month/Day/Year”order.
Setthetimeona12-hourbasis.(Factorydefault)
DATE/TIME FORMAT
Sets the date/time display format.
DATE ..................MM/DD/YYYY
DD/MM/YYYY
YYYY/MM/DD
(YYYY:Year,MM:Month,DD:Day)
TIME ...................Select12-or24-hourtime.
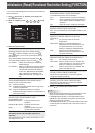
SCHEDULE (See page 29.)
You can turn the power on/off and change the screen
brightnessataspeciedtime.
INPUT SELECT
SelecttheinputmodetobeusedinPCD-Subinputterminal,
PC/AVDVI-Dinputterminal,PC/AVHDMIinputterminaland
PCRGB/AVcomponentinputterminals.
ForD-SUB,selectSETafterselectingtheinputmode,and
then
press
MENU
.
D-SUBandBNCcannotbesettoAVCOMPONENTatthe
same time.
IfD-SUBissettoAVVIDEO,theAVVIDEOinputterminal
cannotbeusedforBNC.
AUDIO SELECT
Selects the terminal used to input audio signals in each input
mode.
INPUT SIGNAL (PC D-SUB/PC RGB)
IfacomputerconnectedtothePCD-sub/PCRGBinput
terminal outputs any of the following resolutions, make a
selection from the following options.
480LINES ..........AUTO,640x480or848x480
768LINES ..........AUTO,1024x768,1280x768,or1360x768
1050LINES ........1400x1050or1680x1050
ZOOM2SPECIALSETTING(See page 28.)
SCAN MODE (AV input)
SetsthescanmodeusedforAVmodeinput.
MODE1 ...............Over-scandisplay
MODE2 ...............Under-scandisplay
MODE3 ...............Under-scandisplaywhentheinputsignal
is1080i/p.Otherwise,over-scandisplay
*
EvenwhenMODE1isselected,under-scandisplayisusedwhen
theinputsignalis1080i/pandthescreensizeisDotbyDot.
POWER MANAGEMENT
POWERMANAGEMENTdetermineswhetherornotto
switch modes from no signal to the input signal standby
mode.
COLOR SYSTEM (AV S-VIDEO/AV VIDEO)
SelectthecolorsystemoftheAVequipmentwhichis
connectedtoAVS-videoandAVvideoinputterminal.(AUTO
/PAL/PAL-60/SECAM/NTSC3.58/NTSC4.43)
WhenAUTOisselected,thecolorsystemisautomatically
set according to the input signal.
HOT PLUG CONTROL
SetswhethertousehotplugcontrolforthePC/AVHDMI
andPC/AVDVI-Dinputterminals.
RS-232C/LAN SELECT
Selects the method with which to control the monitor from
the computer.
ID No. SET
AssignsIDnumberstomonitorsconnectedinadaisychain
(seepage33),usingtheRS-232cables.
Thenumbers1to255areavailableforIDnumbers.
If“0”isset,thesystemregardsthisasthestatewherenoID
number is set.
AUTO ASSIGN ID No.
IDNo.tobeusedwillbeautomaticallyassignedwhen
multiplemonitorsareconnectedwithRS-232C.
Select ON, then press
MENU
.
Performoperationsusingtherstmonitorinthedaisychain.
BAUD RATE
SelectsthecommunicationspeedusedforRS-232C
communication.
LAN SETUP
Conguresthesettingstocontrolthemonitorfromthe
computer via LAN. (See page 43.)
AUTO ASSIGN FIXED IP ADDR.
CanbeenabledwhenRS-232C/LANSELECTisLANand
theDHCPCLIENTisOFF.
SetDHCPCLIENTtoOFFforthemonitorconnectedtothe
RS-232Coutputterminalandthedaisychainofconnected
monitorsthatfollows.FixedIPaddressesareautomatically
allocated.
If the IP address is a duplicate with a network device other
than a monitor, individually change the IP address.
SPEAKER SELECT
Selects the speaker to be used.
HDMI AUTO VIEW
WhenONisselected,thescreensizeisadjusted
automaticallyaccordingtothescreensizecontrolsignal
includedinthevideosignalinputfromtheAVHDMIinput
terminal.
COPY SETTING VALUE
Whenthemonitorhasbeenconnectedtomultiplemonitors
byRS-232C,thesettingsinthemonitorcanbecopiedtothe
monitorconnectedtotheRS-232Coutputterminalandto
the daisy chain of connected monitors that follows.
SelectsthesettingstocopywithCOPYSETTINGVALUE
TARGET.
“PICTURE”ONLY .....CopiesthePICTUREmenusettings.*
ALL ...........................Copiesallthesettings.*
SelecttheIDNo.ofthemonitorthatyouwouldlikecopyto
withCOPYTOIDNo.,thenselectCOPYandpress
MENU
.
If you select ALL, settings will be copied to all monitors.
WhenyouwouldliketoconrmtheIDNo.thatissettothe
monitor,selectIDNo.DISPLAYandpress
.TheIDNo.
will be displayed on the screen.
*CertainsettingdetailssuchasANALOGGAIN,ANALOG
OFFSET,andDISPLAYCOLORPATTERNcannotbe
copied.
LOGO SCREEN
Sets whether or not to display the logo screen.