


Introduction
13
32
41
38
38
29
29
28
41
41
48
46
41
36
38
38
Numbers in Z refer to the main pages in this operation manual where the topic
is explained.
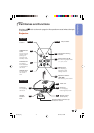
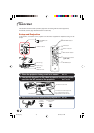
STANDBY button
For putting the
projector into the
standby mode.
KEYSTONE button
For entering the
Keystone Correction
mode.
RETURN button
For returning to the
previous menu screen
during menu operations.
RGB/COMP. button
For switching to the
respective input signal type.
PICTURE MODE button
For selecting the appropriate
picture.
ON button
For turning the power on.
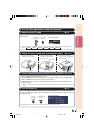
Adjustment buttons
(P/R/O/Q)
• For selecting menu items.
• For adjusting the Keystone
Correction when in the
Keystone Correction mode.
MENU button
For displaying adjustment
and setting screens.
ENTER button
For setting items selected
or adjusted on the menu.
RESIZE button
For switching the screen
size (STRETCH, SIDE
BAR, etc.).
FREEZE button
For freezing images.
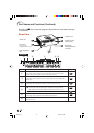
INPUT 1, 2, 3, 4, 5 and 6
buttons
For switching to the
respective input modes.
IRIS button
For switching “HIGH
BRIGHTNESS MODE” and
“HIGH CONTRAST MODE”.
AUTO SYNC button
For automatically
adjusting images
when connected to a
computer.
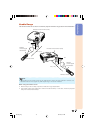
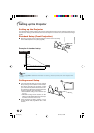
Using the Kensington Lock on the projector
• This projector has a Kensington Security Standard connector for use with a Kensington
MicroSaver Security System. Refer to the information that came with the system for instructions
on how to use it to secure the projector.
Backlight button
For lighting all buttons on the
remote control.
IMAGE SHIFT buttons
For shifting the projected
image vertically.
DT-500_EN_d 06.2.16, 9:56 AM13