


STR-DG820 3-289-452-11(1) GB/FR/ES/DE
3-289-452-11(1)
Sony Corporation © 2008 Printed in Malaysia
Video components/ Eléments vidéo/ Componentes de vídeo/Videokomponenten
OPTICAL
DIGITAL
OUTPUT
L
R
DIGITAL
DMPORT
(ASSIGNABLE)
OPTICAL
OPTICAL
IN
VIDEO 1
IN
COAXIAL
DVD
IN
TV
SAT
IN
DC5V
0.7A MAX
AM
FM
ANTENNA
SAT IN DVD IN BD IN
VIDEO 1 IN OUT
HDMI
AUDIO
OUT
SUBWOOFER
COMPONENT VIDEO
SAT IN DVD IN VIDEO 1 IN MONITOR OUT
Y
P
B
/
C
B
P
R
/
C
R
AUDIO
OUT
VIDEO
OUT
VIDEO 1
AUDIO
IN
VIDEO
IN
VIDEO
OUT
AUDIO
IN
VIDEO
IN
SAT
AUDIO
IN
VIDEO
IN
DVD
MONITOR
IN
TV
OUT IN
SA-CD/CD/CD-R
L
R
DIGITAL
DMPORT
(ASSIGNABLE)
OPTICAL
OPTICAL
IN
VIDEO1
IN
COAXIAL
DVD
IN
TV
SAT
IN
DC5V
0.7AMAX
AM
FM
ANTENNA
SATIN DVDIN BDIN
VIDEO1IN OUT
HDMI
AUDIO
OUT
SUBWOOFER
SPEAKERS
SPEAKERS
CENTER
SURROUNDBACK
FRONTAFRONTB
L
R
SURROUND
L
R
L
L
R
R
COMPONENTVIDEO
SATIN DVDIN VIDEO1IN MONITOROUT
Y
P
B/
C
B
PR/
C
R
AUDIO
OUT
VIDEO
OUT
VIDEO1
AUDIO
IN
VIDEO
IN
VIDEO
OUT
AUDIO
IN
VIDEO
IN
SAT
AUDIO
IN
VIDEO
IN
DVD
MONITOR
IN
TV
OUT IN
SA-CD/CD/CD-R
OUTPUT OUTPUT
INPUT
OUTPUT
C
C
C
C
D
L
R
DIGITAL
DMPORT
(ASSIGNABLE)
OPTICAL
OPTICAL
IN
VIDEO 1
IN
COAXIAL
DVD
IN
TV
SAT
IN
DC5V
0.7AMAX
AM
FM
ANTENNA
SATIN DVDIN BDIN
VIDEO1IN OUT
HDMI
AUDIO
OUT
SUBWOOFER
SPEAKERS
SPEAKERS
CENTER
SURROUNDBACK
FRONTAFRONTB
L
R
SURROUND
L
R
L
L
R
R
COMPONENTVIDEO
SATIN DVDIN VIDEO1IN MONITOROUT
Y
P
B
/
C
B
P
R
/
C
R
AUDIO
OUT
VIDEO
OUT
VIDEO1
AUDIO
IN
VIDEO
IN
VIDEO
OUT
AUDIO
IN
VIDEO
IN
SAT
AUDIO
IN
VIDEO
IN
DVD
MONITOR
IN
TV
OUT IN
SA-CD/CD/CD-R
E
AKERS
SURROUND BACK
L
R
SURROUND
L
R
L
R
DIGITAL
DMPORT
(ASSIGNABLE)
OPTICAL
OPTICAL
IN
VIDEO 1
IN
COAXIAL
DVD
IN
TV
SAT
IN
DC5V
0.7AMAX
AM
FM
ANTENNA
SATIN DVDIN BDIN
VIDEO1IN OUT
HDMI
AUDIO
OUT
SUBWOOFER
SPEAKERS
SPEAKERS
CENTER
SURROUNDBACK
FRONTAFRONTB
L
R
SURROUND
L
R
L
L
R
R
COMPONENTVIDEO
SATIN DVDIN VIDEO1IN MONITOROUT
Y
P
B
/
C
B
P
R
/
C
R
AUDIO
OUT
VIDEO
OUT
VIDEO1
AUDIO
IN
VIDEO
IN
VIDEO
OUT
AUDIO
IN
VIDEO
IN
SAT
AUDIO
IN
VIDEO
IN
DVD
MONITOR
IN
TV
OUT IN
SA-CD/CD/CD-R
SUBWOOFER
AUDIO
OUT
L
R
DIGITAL
DMPORT
(ASSIGNABLE)
OPTICAL
OPTICAL
IN
VIDEO 1
IN
COAXIAL
DVD
IN
TV
SAT
IN
DC5V
0.7AMAX
AM
FM
ANTENNA
SATIN DVDIN BDIN
VIDEO1IN OUT
HDMI
AUDIO
OUT
SUBWOOFER
SPEAKERS
SPEAKERS
CENTER
SURROUNDBACK
FRONTAFRONTB
L
R
SURROUND
L
R
L
L
R
R
COMPONENTVIDEO
SATIN DVDIN VIDEO1IN MONITOROUT
Y
P
B
/
C
B
P
R
/
C
R
AUDIO
OUT
VIDEO
OUT
VIDEO1
AUDIO
IN
VIDEO
IN
VIDEO
OUT
AUDIO
IN
VIDEO
IN
SAT
AUDIO
IN
VIDEO
IN
DVD
MONITOR
IN
TV
OUT IN
SA-CD/CD/CD-R
FRONT A
L
R
L
R
DIGITAL
DMPORT
(ASSIGNABLE)
OPTICAL
OPTICAL
IN
VIDEO 1
IN
COAXIAL
DVD
IN
TV
SAT
IN
DC5V
0.7AMAX
AM
FM
ANTENNA
SATIN DVDIN BDIN
VIDEO1IN OUT
HDMI
AUDIO
OUT
SUBWOOFER
SPEAKERS
SPEAKERS
CENTER
SURROUNDBACK
FRONTAFRONTB
L
R
SURROUND
L
R
L
L
R
R
COMPONENTVIDEO
SATIN DVDIN VIDEO1IN MONITOROUT
Y
P
B
/
C
B
P
R
/
C
R
AUDIO
OUT
VIDEO
OUT
VIDEO1
AUDIO
IN
VIDEO
IN
VIDEO
OUT
AUDIO
IN
VIDEO
IN
SAT
AUDIO
IN
VIDEO
IN
DVD
MONITOR
IN
TV
OUT IN
SA-CD/CD/CD-R
SPE
A
CENTER
L
R
DIGITAL
DMPORT
(ASSIGNABLE)
OPTICAL
OPTICAL
IN
VIDEO 1
IN
COAXIAL
DVD
IN
TV
SAT
IN
DC5V
0.7AMAX
AM
FM
ANTENNA
SATIN DVDIN BDIN
VIDEO1IN OUT
HDMI
AUDIO
OUT
SUBWOOFER
SPEAKERS
SPEAKERS
CENTER
SURROUNDBACK
FRONTAFRONTB
L
R
SURROUND
L
R
L
L
R
R
COMPONENTVIDEO
SATIN DVDIN VIDEO1IN MONITOROUT
Y
P
B
/
C
B
P
R
/
C
R
AUDIO
OUT
VIDEO
OUT
VIDEO1
AUDIO
IN
VIDEO
IN
VIDEO
OUT
AUDIO
IN
VIDEO
IN
SAT
AUDIO
IN
VIDEO
IN
DVD
MONITOR
IN
TV
OUT IN
SA-CD/CD/CD-R
E
AKERS
SURROUND BACK
L
R
SURROUND
L
R
10 mm
1: Installing the speakers/
1: Installation des enceintes/
1: Instalación de los altavoces/
1: Installieren der Lautsprecher
STR-DG820
Quick Setup Guide
Guide d’installation
Guía de instalación rápida
Kurzanleitung
2: Connecting the speakers/2: Raccordement des enceintes/
2: Conexión de los altavoces/2: Anschließen der Lautsprecher
3: Connecting other components/3: Raccordement d’autres
éléments/3: Conexión de otros componentes/
3: Anschließen anderer Komponenten
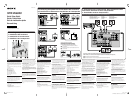
English
This Quick Setup Guide describes how to connect a
DVD player, satellite tuner or set-top box, Blu-ray
disc player, TV, speakers, and a subwoofer so that you
can enjoy multi channel surround sound. Refer to the
operating instructions supplied with the receiver for
details.
The illustrations in the guide designate speakers as
through
.
Front speaker (left)
Front speaker (right)
Center speaker
Surround speaker (left)
Surround speaker (right)
Surround back speaker (left)
Surround back speaker (right)
Subwoofer
1: Installing the speakers
The illustrations above show an example of a 7.1
channel speaker system (seven speakers and one
subwoofer) confi guration. Refer to the operating
instructions supplied with the receiver.
2: Connecting the speakers
Connect the speakers according to the number and type
of your speakers.
About speaker cords
• Use speaker cords, which are appropriate for the
width of the room.
• By deciding on the color or mark of the speaker
cord to be connected to the plus (+) or minus (–)
connector, you can always be sure of connecting the
cord correctly without mistaking plus or minus.
About speaker jacks
• Connect the
jack to the
jack of the receiver and
connect the
jack to the
jack of the receiver.
• Refer to the illustration above for details of
connecting speaker cords.
About the SPEAKERS (OFF/A/B/A+B) button
You can select the speaker system. Refer to “7: Selecting
the speaker system” in the operating instructions supplied
with the receiver for details.
3: Connecting other components
This is an example of how to connect this receiver and
your components. Refer to step 3 and 4 of “Getting
started” of the operating instructions supplied with
this receiver for details on other connections and other
components.
4: Connect all power cords last
Connect the AC power cord to a wall outlet.
Refer to “Connecting the AC power cord (mains
lead)” in the operating instructions supplied with the
receiver.
Français
Ce guide d’installation décrit comment raccorder un lecteur
DVD, un tuner satellite ou un décodeur, un lecteur de
disques Blu-ray, un téléviseur, des enceintes et un caisson
de graves afi n que vous puissiez bénéfi cier du son surround
multicanal. Reportez-vous au mode d’emploi fourni avec
l’ampli-tuner pour plus de détails.
Les illustrations du guide désignent les différentes
enceintes, de
à
.
Enceinte avant (gauche)
Enceinte avant (droite)
Enceinte centrale
Enceinte surround (gauche)
Enceinte surround (droite)
Enceinte surround arrière (gauche)
Enceinte surround arrière (droite)
Caisson de graves
1: Installation des enceintes
Les illustrations ci-dessus montrent un exemple
de confi guration d’un système à 7.1 canaux (sept
enceintes et un caisson de graves). Reportez-vous au
mode d’emploi fourni avec l’ampli-tuner.
2: Raccordement des enceintes
Raccordez les enceintes en fonction de leur nombre et
de leur type.
A propos des cordons d’enceintes
• Utilisez des cordons d’enceintes adaptés à la largeur
de la pièce.
• En choisissant la couleur ou la marque du cordon
d’enceinte à raccorder au connecteur plus (+) ou
moins (–), vous êtes certain de toujours raccorder
correctement le connecteur sans faire d’erreur sur
les bornes plus ou moins.
A propos des prises d’enceinte
• Raccordez la prise
à la prise
de l’ampli-tuner et
la prise
à la prise
de l’ampli-tuner.
• Reportez-vous à l’illustration ci-dessus pour plus de
détails sur le raccordement des cordons d’enceinte.
A propos de la touche SPEAKERS (OFF/A/B
/
A+B
)
Vous pouvez sélectionner le système d’enceinte.
Reportez-vous à la section « 7: Sélection du système
d’enceintes » du mode d’emploi fourni avec l’ampli-
tuner pour plus de détails.
3: Raccordement d’autres
éléments
Ce guide donne un exemple de raccordement de cet
ampli-tuner et de vos éléments. Reportez-vous aux
étapes 3 et 4 de la section « Préparatifs » du mode
d’emploi fourni avec cet ampli-tuner pour plus de
détails sur le raccordement à d’autres éléments.
4: Raccordez tous les cordons
d’alimentation en dernier lieu
Raccordez le cordon d’alimentation secteur à la prise
murale.
Reportez-vous à la section « Raccordement du cordon
d’alimentation secteur » dans le mode d’emploi fourni
avec l’ampli-tuner.
Español
Esta guía de instalación rápida describe cómo conectar
un reproductor de DVD, un sintonizador v
ía satélite
o un decodifi cador, un reproductor de discos Blu-ray,
un televisor, los altavoces y un altavoz potenciador de
graves para que pueda disfrutar del sonido envolvente
multicanal. Consulte el manual de instrucciones
suministrado con el receptor para obtener más
información.
En las ilustraciones de la guía, los altavoces se
identifi can de
a
.
Altavoz frontal (izquierdo)
Altavoz frontal (derecho)
Altavoz central
Altavoz de sonido envolvente (izquierdo)
Altavoz de sonido envolvente (derecho)
Altavoz posterior de sonido envolvente (izquierdo)
Altavoz posterior de sonido envolvente (derecho)
Altavoz potenciador de graves
1: Instalación de los altavoces
Las ilustraciones anteriores muestran un ejemplo
de confi guración de un sistema de altavoces de 7.1
canales (siete altavoces y un altavoz potenciador
de graves). Consulte el manual de instrucciones
suministrado con el receptor.
2: Conexión de los altavoces
Conecte los altavoces en función del número y tipo de
altavoces de que disponga.
Acerca de los cables de los altavoces
• Utilice cables de altavoces que resulten apropiados
para la anchura de la habitación.
Deutsch
In dieser Kurzanleitung wird beschrieben, wie Sie
einen DVD-Player, eine Satellitentuner oder eine
Set-Top-Box, Blu-Ray-Disc-Player, ein Fernsehgerät,
Lautsprecher und einen Subwoofer so anschließen,
dass Sie Mehrkanal-Raumklang wiedergeben
lassen können. Einzelheiten fi nden Sie in der
Bedienungsanleitung zum Receiver.
In den Abbildungen in dieser Anleitung sind die
Lautsprecher mit
bis
gekennzeichnet.
Frontlautsprecher (links)
Frontlautsprecher (rechts)
Centerlautsprecher
Surroundlautsprecher (
links
)
Surroundlautsprecher (rechts)
Surround-Back-Lautsprecher
(
links
)
Surround-Back-Lautsprecher (rechts)
Subwoofer
1: Installieren der Lautsprecher
Die Abbildungen oben zeigen ein 7.1-Kanal-
Lautsprechersystem (fünf Lautsprecher und
ein Subwoofer). Schlagen Sie bitte in der
Bedienungsanleitung zum Receiver nach.
2: Anschließen der Lautsprecher
Nehmen Sie die Lautsprecheranschlüsse je nach Anzahl
und Typ der vorhandenen Lautsprecher vor.
Die Lautsprecherkabel
• Verwenden Sie für die Raumgröße geeignete
Lautsprecherkabel.
• Si se basa en el color o bien en la marca del cable
de altavoz que va a conectar al conector positivo
(+) o bien al negativo (–), se asegurará de conectar
correctamente siempre los cables sin confundir el
polo positivo o el negativo.
Acerca de las tomas de los altavoces
• Conecte la toma
a la toma
del receptor, y
conecte la toma
a la toma
del receptor.
• Consulte la ilustración anterior para obtener más
información sobre cómo conectar los cables de los
altavoces.
Acerca del botón SPEAKERS (OFF/A/B/A+B)
Es posible seleccionar el sistema de altavoces.
Consulte el apartado “7: Selección del sistema de
altavoces” del manual de instrucciones suministrado
con el receptor para obtener más información.
3: Conexión de otros
componentes
Este es un ejemplo de cómo conectar este receptor a
los componentes. Consulte los pasos
3 y 4 de “Procedimientos iniciales” del manual de
instrucciones suministrado con el receptor para
obtener más información sobre cómo realizar otras
conexiones y sobre otros componentes.
4: Conecte todos los cables de
alimentación en último lugar
Conecte el cable de alimentación de ca a una toma de
pared.
Consulte el apartado “Conexión del cable de
alimentación de ca” del manual de instrucciones
suministrado con el receptor.
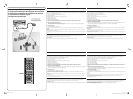
A
A
TV/
Téléviseur
/
Televisor/Fernsehgerät
(1)
A
B
DVD player/
Lecteur DVD/
Reproductor de DVD/
DVD-Player
Satellite tuner or Set-top box/
Tuner satellite ou Décodeur/
Sintonizador vía satélite o decodifi cador/
Satellitentuner oder Set-Top-Box
C HDMI cable/Câble HDMI/Cable HDMI/HDMI-Kable
D Optical digital cord/Cordon numérique optique/Cable digital óptico/Optisches Digitalkabel
Blu-ray disc player/
Lecteur de disques Blu-ray/
Reproductor de discos Blu-ray/
Blu-Ray-Disc-Player
Cords used for connection (not supplied)/Cordons utilisés pour le raccordement (non fourni)/
Cables utilizados para la conexión (no suministrado)/Zum Anschließen verwendete Kabel (nicht mitgeliefert)
Cords used for connection (not supplied)/
Cordons utilisés pour le raccordement (non fourni)/
Cables utilizados para la conexión (no suministrado)/
Zum Anschließen verwendete Kabel (nicht mitgeliefert)
A
Speaker cord/Cordons d’enceintes/Cables de los altavoces/
Lautsprecherkabel
B
Monaural audio cord/Cordon audio mono/Cable de audio mono/
Mono-Audiokabel
A
• Achten Sie beim Anschließen auf die Farbe
oder die Markierung der Lautsprecherkabel, um
sicherzustellen, dass Sie die positiven und negativen
Adern immer richtig mit dem positiven (+) und
negativen (–) Anschluss verbinden.
Die Lautsprecherbuchsen
• Verbinden Sie die Buchse
mit der Buchse
am
Receiver und die Buchse
mit der Buchse
am
Receiver.
• Näheres zum Anschließen der Lautsprecherkabel
entnehmen Sie bitte der Abbildung oben.
Die Taste SPEAKERS (OFF/A/B/A+B)
Damit können Sie das Lautsprechersystem auswählen.
Nähere Informationen fi nden Sie unter „7: Auswählen
des Lautsprechersystems“ in der Bedienungsanleitung
zum Receiver.
3: Anschließen anderer
Komponenten
Hier sehen Sie ein Beispiel für das Anschließen
anderer Komponenten an den Receiver. Nähere
Informationen zum Anschließen anderer
Komponenten fi nden Sie in Schritt 3 und 4 unter
„Vorbereitungen“ in der Bedienungsanleitung zum
Receiver.
4: Zum Schluss: Anschließen
der Netzkabel
Schließen Sie das Netzkabel an eine Netzsteckdose an.
Näheres dazu fi nden Sie unter „Anschließen des
Netzkabels“ in der Bedienungsanleitung zum
Receiver.
GBFRESDE+DG820_2UC.indd 1GBFRESDE+DG820_2UC.indd 1 2/26/2008 4:06:05 PM2/26/2008 4:06:05 PM