


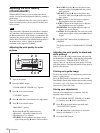


Adjustments
18
Adjusting the Print Quality
(COLOR ADJUST)
With the MENU function, you can adjust the picture
quality. You can check the adjusted results by printing a
guide image.
Three sets of adjusted values for color pictures and for
black-and-white pictures can be stored in memory and
retrieved later.
Note
The print quality adjustment described here is enabled
only when the camera and printer are connected using
the Bluetooth function. If the printer is connected to the
computer, the picture quality can be adjusted using the
printer driver. For details on installation and operation of
the printer driver, refer to “Read me (English)”
contained on the supplied CD-ROM.
Adjusting the print quality for color
pictures
1
Turn on the printer.
2
Press the MENU button.
“COLOR ADJUST COLOR [>>]” appears.
3
Press B of the control button.
“CYN-RED:” appears.
4
Press b or B of the control button for adjustment.
5
Press V of the control button.
“MAG-GRN:” appears.
Repeat Steps 4 and 5 to make necessary
adjustments. Adjustable content for each
adjustment item is as follows:
CYN-RED: Pressing b gives the picture more
cyan, while pressing B makes it more reddish.
MAG-GRN: Pressing b gives the picture more
magenta, while pressing B makes the picture
more greenish.
YEL-BLU: Pressing b makes the picture more
yellowish, while pressing B makes the picture
more bluish.
DARK: Contrast in the dark areas is adjusted.
Pressing B increases the darkness.
LIGHT: Contrast in the bright areas is adjusted.
Pressing B increases the brightness.
SHARPNESS: Pressing B makes the edges of
objects in a picture sharper.
GAMMA: Pressing b makes the color tone of the
whole picture lighter, while pressing B makes it
deeper.
6
Press the EXEC button when the adjustment is
completed.
The display returns to “COLOR ADJUST COLOR
[>>].”
Adjusting the print quality for black-and-
white pictures
When you press V of the control button after pressing
the Menu button in step 2 in “Adjusting the print quality
for color pictures,” COLOR ADJUST B/W [>>]
appears, and you can adjust the print quality for black-
and-white pictures. The adjusting method is the same as
that for color pictures.
Printing out a guide image
To check the results of your adjustments, print out the
camera’s guide images.
Press the SIZE button of the camera to select Guide
Print-RGB or Guide Print-DLGm, then execute printing.
For details, refer to the Instruction Manual (Advanced
Operations) of the UPX-C200.
Storing your adjustments
Once the color adjustment is completed, save the
adjusted values as follows:
1
In the COLOR ADJUST COLOR [>>] or B/W
[>>] display, press B of the control button.
2
Press V of the control button repeatedly until
“SAVE SETTING” appears.
3
Press b or B of the control button to select the
memory-cell number (1, 2, or 3).
4
Press the EXEC button.
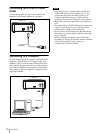
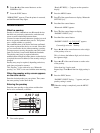
ALARM
PRINT
MENU
EXEC
DIGITAL PHOTO PRINTER
1
123
645