


Change text in this variable definition to document title.
124
The System Recovery CD contains a backup copy of all the software originally
installedonyourharddiskdrive.It can be used only to recover the hard disk
of the notebook you purchased.
The System Recovery utility gives you Full Restore with Format, that is it
formats the hard disk drive then restores all the original software.
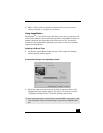
To use the System Recovery CD(s)
1 Insert the Sony System Recovery CD in the optical drive.
2 Shut down your notebook as described in “Shutting Down Your Notebook”
in the printed Quick Start.
3 Wait four seconds and turn on your notebook.
4 Click OK to signify you have read and accept the Microsoft End-User
License Agreement.
5 When the System Recovery menu appears, follow the on-screen instructions
to complete the recovery process.
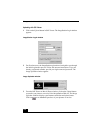
If your notebook does not start from the Recovery CD
1 Press the power button and hold it for more than four seconds to turn off the
notebook.
2 Turn on the notebook. When the Sony logo is displayed, press the F2 key.
The BIOS setup menu screen appears.
3 Press the arrow keys to select the Exit menu.
4 Press the arrow keys to select “Get Default Values” andthenpresstheEnter
key. The message “Load default configuration now?” appears.
5 Check that “Yes” is selected, then press the Enter key.
Full Restore with Format removes all the information on the hard disk drive.
You will lose any software you have installed and any other files you have
created since you started to use your notebook. This means you will have to
reinstall any applications that were not included with the notebook when you
purchased it. If you have any questions on using the System Recovery CD,
contact Sony Customer Support.