2-318-780-21(1)
©2002 Sony Corporation
WM-SR10
Operating Instructions
¯ ï
“WALKMAN” is a registered trademark of Sony Corporation to
represent Headphone Stereo products.
is a trademark of Sony Corporation.
B
Specifications
Frequency range
FM: 65.0 - 107.9 MHz (Eastern Europe)
87.5 - 108 MHz (Italy and Saudi Arabia)
87.6 - 108 MHz (North, Central and South America)
87.6 - 107.9 MHz (Other countries)
AM:526.5 - 1 606.5 kHz (Italy and Saudi Arabia)
530 - 1 710 kHz (North, Central and South America)
531 - 1 602 kHz (Other countries)
Frequency response Playback: 40 - 15 000 Hz
Recording: 100 - 8 000 Hz
Input Microphone (MIC) jack
Output Headphones (i) jack, Load impedance 8 - 300 Ω
Speaker Approx. 5 cm (2 in.) dia.
Power requirement 3V DC
Batteries R6 (AA) x 2
External DC 3 V power sources
Dimensions
Approx. 112.0 × 82.5 × 37.5 mm (4
1
⁄
2
× 3
1
⁄
4
× 1
1
⁄
2
inches)
(w/h/d), excl. projecting parts and controls
Mass Approx. 187 g (6.6 oz) (main unit only)
Supplied accessory
Stereo headphones or Stereo earphones (1)
Design and specifications are subject to change without
notice.
Battery life* (approximate hours)
Sony alkaline LR6(SG)
**
Sony R6P(SR)
(using headphones/earphones)
Tape playback 24 7
Radio reception 48 15
Mic recording 20 4.5
Radio recording 12 3
(using the speaker)
Tape playback 15 4.5
Radio reception 26 6
Radio recording 11.5 3
*Measured value by the standard of JEITA (Japan Electronics
and Information Technology Industries Association).
(Using a Sony HF series cassette tape)
**When using LR6 (SG) Sony alkaline dry batteries
(produced in Japan).
Note
The battery life may be shorter depending on the operating
condition, the surrounding temperature and battery type.
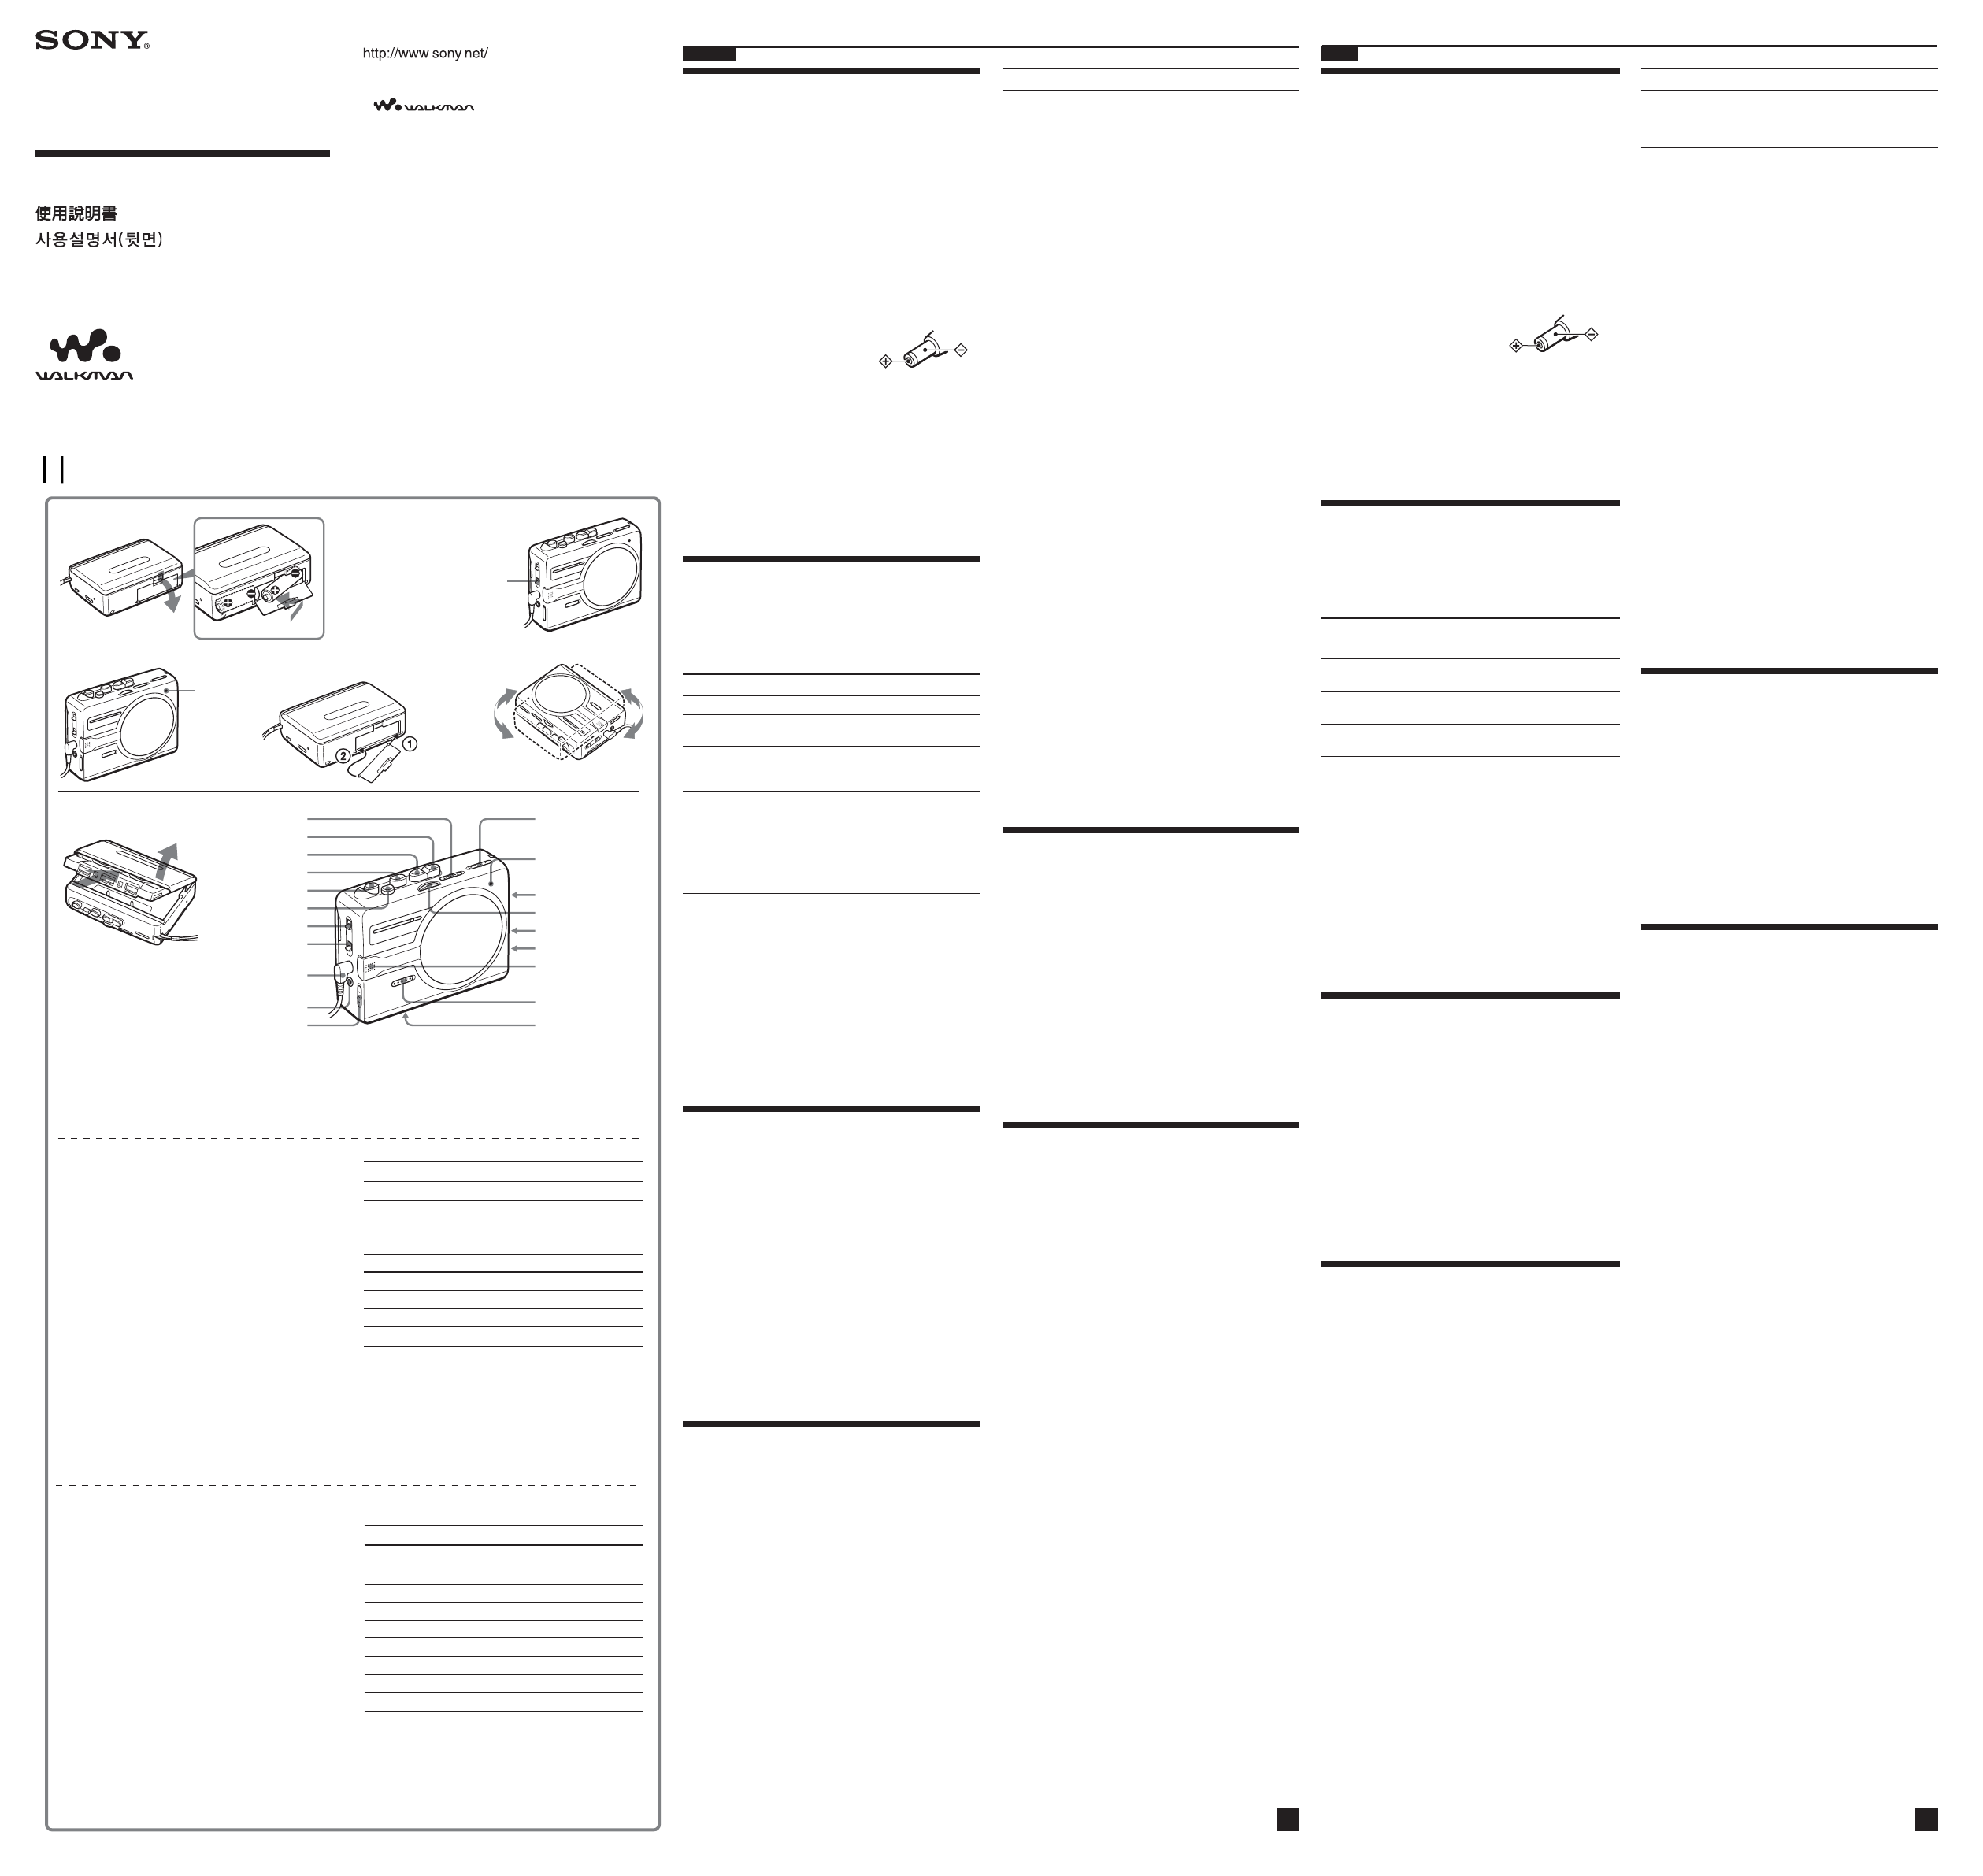
FM
AM
NPLAY**
MFF/CUE
DC IN 3 V
mREW/REVIEW
xSTOP
SPEAKER/i
VOL*
TUNING
i
zREC
(RADIO OFF) TAPE/
AM/FM
AVLS
BATT indicator
PAUSE
MIC (PLUG IN POWER)**
SOUND BOOST
ISS
BATT
indicator
English
Preparations
To Insert batteries A-A
Slide open the battery compartment lid, and insert
two R6 (size AA) dry batteries with correct polarity.
Replace the batteries with new ones when the BATT
indicator dims. A-B
Note
For maximum performance we recommend that you use
Sony alkaline batteries.
To attach the battery compartment lid, if
it is accidentally detached
Attach it as illustrated. A-C
To use external power
Connect the AC power adaptor
AC-E30HG (not supplied) to the
DC IN 3 V jack and to the mains.
Do not use any other AC power
adaptor.
Specifications for AC-E30HG vary for each area.
Check your local voltage and the shape of the plug
before purchasing.
Notes
•Connect the AC power adaptor to an easily accessible
AC outlet. Should you notice an abnormality in the AC
power adaptor, disconnect it from the AC outlet
immediately.
•Do not touch the AC power adaptor with wet hands.
Playing a Tape
1 Insert a cassette.
2 Set (RADIO OFF) TAPE/AM/FM to
(RADIO OFF) TAPE.
3 Press N PLAY.
To Press/switch
Stop playback* x STOP
Fast-forward or M FF/CUE or m REW/
rewind the tape** REVIEW during stop
Search forward Press and hold M FF/CUE and
during playback release it at the point you want
(CUE)
Search backward Press and hold m REW/
during playback REVIEW and release it at the
(REVIEW) point you want
Pause playback PAUSE in the direction of the
arrow
To release pause, slide PAUSE
to the opposite direction of the arrow.
* When the tape ends, the depressed button N PLAY
is released automatically (Auto shut-off function).
**If you leave the unit after the tape has been wound or
rewound, the batteries will be consumed rapidly. Be
sure to press x STOP.
Note
Do not open the cassette holder while the tape is running.
To use the speaker
Set SPEAKER/i to SPEAKER. The sound will play
from the speaker and no sound from the
headphones/earphones. When the speaker is in use,
the AVLS function will not work.
Listening to the Radio
Since the headphones/earphones cord serves as an
FM antenna, connect the headphones/earphones
even when using the speaker.
1 Set (RADIO OFF) TAPE/AM/FM to AM or
FM.
2 Turn TUNING to tune in to the station you
want.
To turn off the radio
Set (RADIO OFF) TAPE/AM/FM to (RADIO OFF)
TAPE.
To improve broadcast reception B
•For FM: Extend the headphones/earphones cord
(antenna). If the reception is still not good, adjust
FM ST/MONO or DX/LOCAL.
•For AM: Reorient the unit itself.
Recording
Notes
•If the record-protect tab is broken, you cannot record
on that side.
•Use new batteries when recording.
•If a howling occurs, turn down the volume.
•When recording with the microphone, the sound to be
recorded cannot be heard through the speaker.
1 Insert a TYPE I (normal) tape.
2 To record with the built-in microphone:
1 Place the unit on a hard surface (such as
a desk) with the cassette holder side
down, so that the microphone can record
effectively.
2 Set (RADIO OFF) TAPE/AM/FM to
(RADIO OFF) TAPE.
To record from the radio:
1 Set (RADIO OFF) TAPE/AM/FM to AM
or FM.
2 Tune in to the station you want to record
(see “Listening to the Radio”).
3 Press z REC.
N PLAY is pressed simultaneously and
recording starts. The recording level is
automatically adjusted.
To Press/switch
Pause a recording PAUSE
Stop recording x STOP
Start recording during z REC during playback
playback
To reduce noise while recording AM
programs
Set the ISS (Interference Suppress Switch) to the
position that reduces noise the most.
Notes on recording
•The recording level is fixed.
•Actual recording will start about 2 seconds after you
press z REC. Press z REC about 2 seconds before the
moment you want to start recording, or you will miss
the beginning of your recording.
•Do not use a high-position (TYPE II) or metal (TYPE
IV) tape. If you do, the sound may be distorted when
you play back the tape, or the previous recording may
not be erased completely.
•Do not connect or disconnect the headphones/
earphones to/from the i jack while recording from
the radio. The recording condition may change
abruptly, or noise may be recorded.
•When recording with the microphone, do not place it
near a lamp cord or a fluorescent lamp as this may
cause interference noise.
•No other operation can be done while recording. For
other operations, stop recording first.
To prevent a tape from being accidentally
recorded over
Break off the tabs from side A and/or B. To reuse the
tape for recording, cover the tab hole with adhesive
tape.
Recording from various sound sources
To record with an external microphone
Connect an external microphone to the MIC (PLUG
IN POWER) jack.
Use a microphone such as the ECM-DS70P (not
supplied).
When using a plug-in-power system microphone,
the power to the microphone is supplied from this
unit.
To record from another equipment
Connect another equipment to the MIC (PLUG IN
POWER) jack using such as the RK-G134 connecting
cord (not supplied).
Using Other Functions
(Only when using headphones/earphones)
Protecting your hearing—AVLS
(Automatic Volume Limiter System)
Set AVLS to LIMIT. The maximum volume is kept
down to protect your ears even if you turn the
volume up.
To cancel the AVLS function, set AVLS to NORM.
Listening with powerful sound
Set SOUND BOOST to ON to obtain the Sound Boost
effect which emphasizes both treble and bass.
Note
When you set AVLS to LIMIT, the SOUND BOOST
effect is reduced.
Precautions
On batteries
• Do not carry dry batteries with coins or other metallic objects.
It can generate heat if the positive and negative terminals of the
batteries are accidentally contacted by a metallic object.
• When you are not going to use your Walkman for a long time,
remove the batteries to prevent damage from battery leakage
and corrosion.
On handling
• Do not put any heavy object on top of the unit. The unit may be
damaged.
• Do not leave the unit in a location near heat sources, or in a
place subject to direct sunlight, excessive dust or sand,
moisture, rain, mechanical shock, or in a car with its windows
closed.
•We do not recommend the use of tape longer than 90 minutes.
They are very thin and tend to be stretched easily. This may
cause malfunction of the unit or sound deterioration.
•If the unit has not been used for a long time, set it in the
playback mode to warm it up for a few minutes before you
start using it again.
• Keep personal credit cards using magnetic coding or spring-
wound watches, etc., away from the unit to prevent possible
damage from the magnet used in the speaker.
On headphones/earphones
Road safety
Do not use headphones/earphones while driving, cycling, or
operating any motorized vehicle. It may create a traffic hazard
and is illegal in some areas. It can also be potentially dangerous
to play your headphones/earphones at high volume while
walking, especially at pedestrian crossings.
You should exercise extreme caution or discontinue use in
potentially hazardous situations.
Preventing hearing damage
Do not use headphones/earphones at high volume. Hearing
experts advise against continuous, loud and extended play. If
you experience a ringing in your ears, reduce the volume or
discontinue use.
Caring for others
Keep the volume at a moderate level. This will allow you to hear
outside sounds and to be considerate to the people around you.
On maintenance
•Clean the tape head and tape path using a cotton swab and
commercially available cleaning solvent after every 10 hours of
use.
•To clean the exterior, use a soft cloth slightly moistened in
water. Do not use alcohol, benzine or thinner.
•Clean the headphones/earphones plugs periodically.
Built-in microphone
Battery compartment
* There is a tactile dot beside VOL on the main unit to show the direction to turn up the volume.
**The button/jack has a tactile dot.
*
**
FM ST/MONO
(or/ ) DX/LOCAL
FM ST/MONO
(or/ )
DX/LOCAL
Radio
Cassette-Cor der
A A
R6 (AA) x 2
i Ω
×
× ×
**
A-A
A-B
A-C
•
•
1
2
3 N
x
** M m
M
m
N
**
x
i
1
2
B
•
•
•
•
•
•
1
2
1
2
1
2
3 z
N
x
z
•
• z
z
•
• i
•
•
•
•
•
•
•
•
•
•
•
•
Polarity of the plug
BC