


2.PRINTING FROM WINDOWS
Setting Up Print Options 23
2 PRINTING FROM WINDOWS
y If the print job has several pages in the document, only the first page of the document will be saved as an
overlay file.
y Both the overlay file and the documents on which you superimpose the overlay image must be created at the
same size and orientation.
y When creating an overlay file using the PS3 printer driver from an application that can create the PS command
directly, the overlay file will not be created properly. In that case, disable the [Use PostScript Passthrough]
option in the [PostScript Settings] dialog box.
P.48 “PostScript Settings”
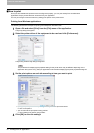
- Store to e-Filing
Select this option to save a job to e-Filing. When this option is selected, select the box after the print setting has
been finished. When the SNMP communication is enabled, it detects the available box numbers and box name. If
not, all are listed in the box.
If you select a user box, you may be required to enter the appropriate password for the selected box. The job saved
to a box can be printed from the touch panel display at a later time. It can also be composed with other documents
using the e-Filing web utility.
You can also print a job and save it to a box by checking on the [Print] option.
y When you store a document in e-Filing using the printer driver, the printing image (not the original document in
your computer) will be stored in e-Filing.
y Documents stored in e-Filing are retained with the best image quality for printing. If you want to download them
into your computer with a higher image quality, scan the original documents and store them in e-Filing.
y For more information about e-Filing operations, refer to the e-Filing Guide.
y For the detailed instructions on how to print with the [Print job] setting, see the following page:
P.55 “Printing various print job types”
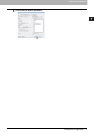
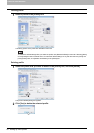
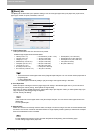
4) Preview window
In the Preview window, you can check the current settings in the printer driver. You can change the view type by
clicking [Graphics] to display the print options settings graphically or [Text] to display the print option settings in text
form.
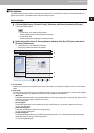
5) Profile
Print option settings can be saved on your hard disk. You can save print option settings by clicking [Save Profile] and
easily load a setting file by selecting a profile name in the box.
P.18 “Setting print options using profiles”
There are 4 factory default profiles.
6) [Restore Defaults]
Click this button to restore the settings to the original factory defaults.
7) [OK]
Click this button to enter the input settings and complete the print option settings.
8) [Cancel]
Click this button to cancel the input settings and exit the print option settings.
9) [Apply]
Click this button to enter the input settings without closing the print option settings. This button is only displayed when
the printer properties are accessed from the Printers folder. This button remains grayed out until a setting is changed.
10)[Help]
Click this button to browse the Help for the printer driver.