


2.6 2.5” HDD Troubleshooting 2 Troubleshooting Procedures
PORTEGE A100 Maintenance Manual (960-460) 2-33
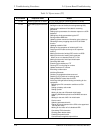
Procedure 2 Message Check
When the power is turned on, the system performs the Initial Reliability Test (IRT) installed
in the BIOS ROM. When the test detects an error, an error message is displayed on the screen.
Make sure of no floppy disk in the FDD. Turn on the computer and check the message on the
screen. When an OS starts from the 2.5” HDD, go to Procedure 3. Otherwise, start with Check
1 below and perform the other checks as instructed.
Check 1 If any of the following messages appear, go to Procedure 3. If the following
messages do not appear, perform Check 2.
HDC ERROR
or
HDD #X ERROR (After 5 seconds this message will disappear.)
Check 2 If either of the following messages appears, go to Check 3. If the following
messages do not appear, perform Check 5.
Insert system disk in drive
Press any key when ready .....
or
Non-System disk or disk error
Replace and press any key when ready
Check 3 Check SETUP to see whether the Hard Disk option is set to Not used. If it is set to
Not used, choose another setting and return to Check 1. If it is not set to Not used,
go to Check 4.
Check 4 Using the SYS command of the MS-DOS, transfer the system to the 2.5" HDD. If
the system is not transferred, go to Procedure 3. Refer to the MS-DOS Manual for
detailed operation.
If the following message appears on the display, the system program has been
transferred to the HDD.
System Transferred
If an error message appears on the display, perform Check 5.
Check 5 The 2.5" HDD and the connector of the system board may be disconnected (Refer
to the steps described in Chapter 4, Replacement Procedures for disassembling.).
Insert the connectors firmly. If they are firmly connected, go to Procedure 3.