35
Operations
34
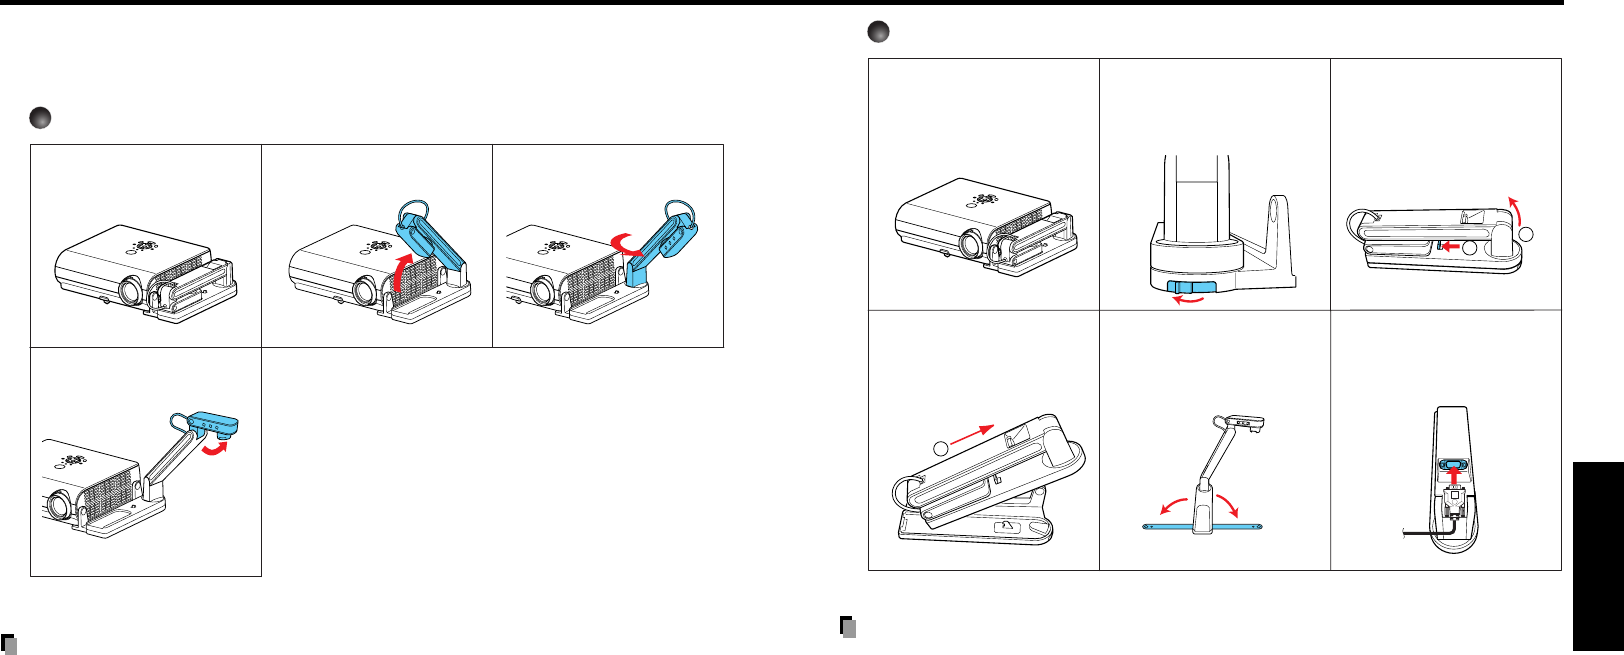
Using the document camera
Please read this chapter if the model you purchased is TDP-SC35 which includes a
document camera.
■ How to use the document camera
Using the camera attached on the projector
PRECAUTIONS
•For camera interconnection, be sure to use the supplied RGB cable (25 cm or 3 m). If you
use the other cables, the normal operation may not be achieved and even the malfunction
may result.
• When moving the projector with the camera attached, do not grab the camera arm and/or
the camera head.
•
When moving the projector with the camera attached, first ensure that the camera is securely
locked in position on the tray
.
• Insert the RGB cable straight and securely until it is fixed in place.
• Do not jolt or force the camera head or camera arm. Doing so could cause malfunction.
• Note that when extending or rotating the camera arm, the arm moves in an arc. Take care
not to bump yourself or others with it.
• When placing the projector in the carrying bag, remove the connection cables. Otherwise,
damage to the connectors and cables may result.
Status before preparation
(When stored)
1) Set up arm.
2) Rotate arm.
3) Raise camera head.
Using the camera removed from the projector
2
1
1
PRECAUTIONS
• Installation of the document camera onto the tray should be performed in the reverse
order shown above.
• When replacing the document camera on the tray, ensure that the lock lever is securely
locked in position.
• When using the tip resistant bars, pull them fully until each forms the angle of 90 degree.
If you don’t use the bars, the camera may topple over.
Status before preparation
(When stored)
1) Disconnect the RGB
cable, then slide the
lock switch to release
lock.
2) While pushing the lock
lever in the arrow
direction, lift up the
document camera.
4) Extend the tip resistant
bars to set the
document camera.
5) Connect the document
camera and the
projector using the
supplied RGB cable.
3) Remove the document
camera from the tray.
Pull up toward direction
q


