


Fuse Replacement
A user-replaceable AC Power Fuse is located just below the AC Power
Switch at the rear of the printer. The replacement fuse is a 3AG Fast
Blow style rated at 5 Amp/250 VAC
Before replacing the fuse, turn the AC Power Switch OFF and unplug
the AC Power Cable.
To replace the fuse, insert the tip of a flatblade screwdriver into the slot
in the end of the Fuse Holder End Cap. Press in slightly on the End Cap
and turn the screwdriver slightly counterclockwise. This will disengage
the End Cap from the Fuse Holder and permit removal of the fuse.
To install a new fuse, reverse the sequence.
Shipping
To ship the Z Series™ printer, remove all ribbon and media from the
supply and take-up spindles to prevent damage to the printer. Carefully
pack the printer in a suitable container to avoid damage during transit.
Whenever possible, use the original “carton within a carton” packing
materials from the factory. A shipping container can be purchased from
Zebra Technologies Corporation if the original packaging is lost or de-
stroyed.
If you use a different container, package the printer carefully to avoid
damage.
CAUTION: When packaging the printer in a rigid container, use
shock mounts or shock-absorbing packing material.
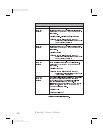
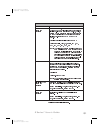
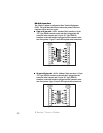
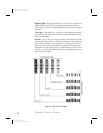
Setting Darkness For “In-Spec” Bar Codes
All Direct Thermal and Thermal Transfer materials do not have the
same Darkness requirements. The best way to check for the proper
darkness setting is to use a Bar Code Verifier that actually measures
bars/spaces and will calculate the PCS ratio. Without the assistance of a
verifier, your eyes and/or the scanner to be used in the system, are the
best bet for picking the optimum darkness setting. The following is a
simple yet effective method for adjusting the darkness setting to print
“In Spec” bar codes. Refer to Figure 31 for sample bar codes.
76 Z Series™ User’s Guide
84
H:...uspiran2.vp
Thu Jun 25 11:20:47 1998
Color profile: Disabled
Composite Default screen