


If you are experiencing difficulties with your installation, try the following:
• Ensure all networking equipment is switched on. The Gateway
should be showing a green Power LED. If it is not, check the power
adapter connection. Do not use any power adapter with your
Gateway other than the one supplied.
• Ensure the Cable/DSL Modem is connected. The Gateway
should be displaying a yellow Cable/DSL Status LED. If no LED is
displayed, check that your modem is switched on and that it is
connected to the Cable/DSL port with an Ethernet cable.
• Ensure that the computer is connected to the Gateway. The
Gateway should be displaying a green or yellow LAN Status LED. If
it is not, check that the computer is connected to one of the
Gateway's LAN ports with an Ethernet cable.
• Ensure your computer is configured correctly. Make sure that the
computer obtains an IP address automatically. See Section 3 for
details. Ensure that the NIC card is configured for autonegotiation.
• Ensure that you do not have a web proxy enabled on your
computer. Go to the Control Panel and click on Internet Options.
Select the Connections tab and click on the LAN Settings button at
the bottom. Make sure that the Use Proxy Server option is
unchecked
• If you are unable to access the Gateway's Web interface.
Launch a web browser and enter http://192.168.1.1. If you chose
a different IP address, use that instead. Ensure that you include the
http:// prefix.
• If you cannot remember the Gateway IP address. Run the
Gateway Discovery application from the CD-ROM. This will always
connect you to the Gateway.
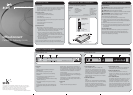
Connecting Your Gateway
1. Connect the power adapter to the Gateway and wait for the Alert LED
to stop flashing.
2. Ensure that your modem and computer are both switched on.
3. Use the supplied cable to connect the Gateway's Ethernet Cable/DSL
port to the modem. Check that the Cable/DSL Status LED lights.
4. Connect your computer to one of the 10/100 LAN ports on the
Gateway. Check that the LAN Port Status LED lights.
Refer to Figure 7 for an example configuration.
Running the Configuration Wizard
1. Insert the Gateway CD-ROM in the CD-ROM drive on your computer.
The Discovery application will attempt to start automatically, but if it
fails, click on Start, Run and enter d:\gateway-discovery.exe
(where d: is your CD-ROM drive letter).
Note: Discovery will find the Gateway even if it is unconfigured or
misconfigured.
2. When the Welcome screen is displayed click on Next and wait until
the application discovers the Gateways connected to your LAN.
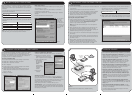
3. Figure 2 shows an example Discovered Devices screen. Highlight the
Cable/DSL Gateway by clicking on it, and press Next.
4. Click on Finish to launch a web browser and display the login page for
the Gateway.
5. Login using the default password admin. The Wizard will attempt to
launch automatically, but if it fails, select the Wizard tab and click on
the Wizard... button.
6. Where possible, the Wizard will recommend settings for most
parameters. However, there are some settings which you must
provide. Most of these will have been provided to you by your ISP
7. By default, 3Com recommends that you leave the LAN IP address for
the Gateway as 192.168.1.1. However, if you should choose to
change it, make a note of the new address :
8. When the DHCP Server Settings page is displayed, make sure that the
Enable the DHCP Server with the following settings option is selected.
2 PREPARING YOUR GATEWAY FOR USE
PROBLEM SOLVING
Gateway's LAN IP Address _______._______._______._______.
Before you install and configure your Gateway, you need the following
additional information. If you do not have this information, contact your
Internet Service Provider. Space is provided below for you to record this
information.
If your ISP allocates IP information dynamically over PPPoE, you need
your User Name and Password:
If your ISP allocates fixed or static IP information, you need the following
information:
Note: If your ISP allocates IP information dynamically over a protocol
other then PPPoE, you do not need any further information.
PPPoE Client Software
If you have PPPoE client software installed on your computer, you will
need to disable it. To do this:
1. From the Windows Start menu, select Settings > Control Panel.
2. Double click on Internet Options.
3. Select the Connections Tab. A screen similar to Figure 1 should be
displayed.
4. Select the Never Dial a Connection option.
You may wish to
remove the
PPPoE client
software from
your computer to
free resources, as
it is not required
for use with the
Gateway.
PPPoE User Name
PPPoE Password
IP Address _______._______._______._______.
Subnet Mask _______._______._______._______.
Default Gateway address _______._______._______._______.
DNS address _______._______._______._______.
1
BEFORE YOU INSTALL YOUR GATEWAY
Figure 1
Figure 2
Once the Wizard has completed, the Gateway is ready for use. Before
you can use it to access the Internet, you may need to make some
changes to the configuration of your computers depending on how they
are set up. As a minimum you must ensure that your computers are
configured to obtain an IP address automatically.
To do this on Windows 2000
1. From the Windows Start Menu, select Settings > Control Panel.
2. Double click on Network and Dial-Up connections.
3. Double click on Local Area Connection.
4. Click on Properties.
5. A screen similar to Figure 3 should be displayed. Select Internet
Protocol TCP/IP and click on Properties.
6. Ensure that the options Obtain an IP Address automatically, and
Obtain DNS servers automatically are both selected as shown in
figure 4. Click OK.
7. Restart your computer.
To do this on Windows 95, 98 and ME
1. From the Windows Start Menu, select Settings > Control Panel.
2. Double click on Network. Select the
TCP/IP item for your network card as
shown in figure 5 and click on Properties.
3. In the TCP/IP dialog, select
the IP Address
tab, and ensure
that Obtain IP
address
automatically is
selected as shown
in figure 6.
Click OK.
4. Restart your
computer.
Accessing the Internet
Launch your web browser and attempt to contact the Gateway by
typing the following URL in the location bar: http://192.168.1.1, (if
you changed the IP address, use the address you allocated.) If you are
able to access the Login page, then your computer has correctly
received an IP address from the Gateway.
Finally, attempt to browse to an Internet web site, such as
www.3com.com. If you can successfully access this site, then your
computer, Gateway and internet modem have been correctly configured.
Refer to the Problem Solving section if you cannot make contact with
the Gateway or the Internet.
Figure 3 Figure 4
Figure 5
Figure 6
3
CHANGING YOUR NETWORK’S CONFIGURATION
OfficeConnect
Cable/DSL Gateway
Your existing
Cable/DSL
Modem
OfficeConnect
Switch
Off
iceConnect
Cable/DSL
Gateway
3
C
8
5
5
LAN
Status
Cable/DSL
A
l
e
r
t
Internet
Figure 7
Example Network with OfficeConnect Cable/DSL Gateway.
when you set the account up. Refer to section 1 for details.
For further Problem Solving and Technical Support information,
refer to the Gateway User Guide.