


74 CHAPTER 3: CONFIGURING WIRELESS SERVICES
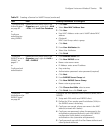
All—Include all MAP or wired authentication ports. Go to step 13.
Selected—Include a selected list of ports. Go to the next step.
None—Include no ports. Go to step 13.
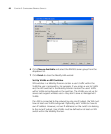
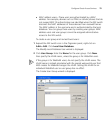
7 Click Choose Available. The Physical Port Selection dialog box appears.
8 Select the ports to be included in the Mobility Profile. To make multiple
selections. press Shift (for contiguous items) or Control (for
noncontiguous items) while clicking items.
9 In the Distributed MAPs list, specify the Distributed MAPs to include in
the Mobility Profile:
All—Include all Distributed MAPs. Go to step 13.
Selected—Include a selected list of Distributed MAPs. Go to the
next step.
None—Include no Distributed MAPs. Go to step 13.
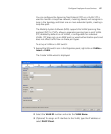
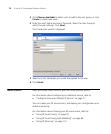
10 Click Choose Available.
11 Select the Distributed MAPs to be included in the Mobility Profile.
12 Click Close. The Create Mobility Profiles dialog box is active.
13 Click Finish to save the changes and close the wizard.
Configure Local
Authentication
The WX switch contains a local database that can store user information
for a 3Com WLAN. You can use the local database to create users and
authenticate them, or you can use the local database in conjunction with
a RADIUS server. For example, although you might use a RADIUS server
to manage most users, you could define IT staff as users in the local
database in the event that the RADIUS server is unavailable.
You can create two types of users in the local database:
Named users—These users are authenticated by username and
password and are assigned to specific VLANs. Users include
administrators and network users. You can group these users by
creating user groups, in order to simplify configuration.