


Mounting the Switch on a Desktop 27
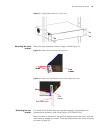
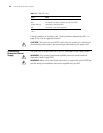
Figure 22 Installation completed 2
Mounting the Switch
on a Desktop
In many cases, standard 19-inch racks are not available. Therefore, switches are
often placed on a desktop. To place your switch on a desktop, you simply need to:
■ Make sure that the surface is clean, flat, and sturdy.
■ Makes sure that the environment is well ventilated and allow 10 cm (3.9 in.) of
space around the chassis for heat dissipation.
■ Do not place heavy objects on your switch.
■ When stacking, the vertical distance between two switches must be at least 1.5
cm (0.59 in).
The Power-up
Sequence
The following sections describe how to get your Switch 4210 powered-up and
ready for operation.
Powering-up the Switch
4210
Use the following sequence of steps to power-up the Switch.
1 Plug the power cord into the power socket at the rear of the Switch.
2 Plug the other end of the power cord into your power outlet.
The Switch powers-up and runs through its Power On Self Test (POST), which
takes approximately one minute.
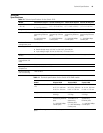
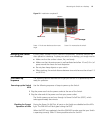
Checking for Correct
Operation of LEDs
During the Power On Self Test, all ports on the Switch are disabled and the LEDs
light. The PWR LED will flash green during the POST.
When the POST has completed, check the PWR LED to make sure that your Switch
is operating correctly. Table 13 shows possible colors for the LED.
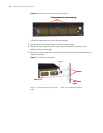
Screw 1: Fix the rear bracket to the mount
angle.
Screw 2 is mounted to the switch.
Screw 2
Screw 1
Rear mount angle
Rear bracket
Screw 2
Screw 1
Rear mount angle
Rear bracket