


4 Mounting the Access Point
The access point can be mounted on the following types of surfaces:
• Wall, ceiling, or electrical box (NEMA enclosure)
•Tabletop
.
Wall, Ceiling, or Electrical Box Mounting
To mount the access point to a wall, ceiling, or electrical box:
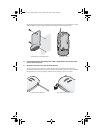
1 Remove the access point from the mounting bracket.
2 Screw the mounting bracket to a wall, ceiling, or electrical box (NEMA enclosure):
• If mounting to a solid surface wall or ceiling, use the two sheet metal screws.
• If mounting to drywall, use the two sheet metal screws and two wall anchors.
• If mounting to an electrical box (NEMA enclosure), use the two threaded screws.
3 Route the power cable (if using an external power supply) and Ethernet cable
through the large opening on the back of the mounting bracket.
.
CAUTION: The access point is intended for indoor use only. Do not install the access point
outdoors unless you install it in a properly installed outdoor access point enclosure.
CAUTION: For easy installation and removal of the access point from the mounting
bracket, make sure that there is sufficient flexibility with the cable and that there is
adequate service loop (that is, enough cable routed through the mounting bracket
to easily connect the cable to the access point.) If not enough cable is routed
through the back of the mounting bracket, or if the cable is inflexible, it can be
difficult to install or remove the access point from the mounting bracket.
10015413-AA_AP2750_QSG.fm Page 5 Wednesday, July 26, 2006 4:50 PM