


Product & Instruction Bulletin 8700/8800 - 3
On a weekly basis, remove the premixed toners from the printer and the concentrates from
the toner station, replace the cap, and shake well, to maintain good dispersion and optimal
printing characteristics.
Two-Part Pre-Mix
Instructions
Read these instructions before opening the bottles, and use the when mixing two-part premix
toners, Part A and Part B.
Mix the two-part toners and then allow an 8 hour rest before using them in the printer.
1. For personal safety, we recommend wearing protective gloves, glasses and lab coat.
2. Before removing the cap from the smaller bottle, shake it for 1 minute.
3. Place the larger bottle (clear liquid) onto a piece of absorbent paper on the floor.
4. Remove the cap from the large bottle and remove the metal foil seal.
5. Carefully remove the cap and seal from the small bottle.
6. Slowly pour the contents of the small bottle into the large bottle.
7. When the small bottle is empty, replace the cap.
8. Tightly fasten the large cap onto the large bottle.
9. Do not lift the large bottle, but thoroughly shake it by sliding it back and forth on the floor
for thirty (30) seconds.
10. Let this pre‐mix sit at room temperature for 8 hours before using in your printer, and then
use these mixed toners as soon as possible.
Toner Replacement Steps
1. Allow the printer to drain the toner lines for 5 minutes before removing the premix and
concentrate bottles.
2. Replace the black, yellow, cyan, and magenta toner premix bottles with cleaner 8790.
3. Replace the black, yellow, cyan, and magenta concentrate bottles with cleaner 8792.
4. Run a flush cycle to clean out any current toner and concentrate that is in the toner lines
and pumps of the printer and toner station. (Refer to the Printer 2000 Operator’s Guide
for further details on flushing the printer and toner station.)
5. After the flush cycle is completed, remove the cleaners and replace them with the NEW
black, yellow, cyan, and magenta toner premixes in the printer, and reinstall, or replace if
needed the concentrate in the toner station.
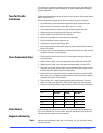
6. Clean the printer so it is ready to produce graphics using the new toners. Print a test
pattern and measure the densities of a 100% solid fill of each color of the new toners.
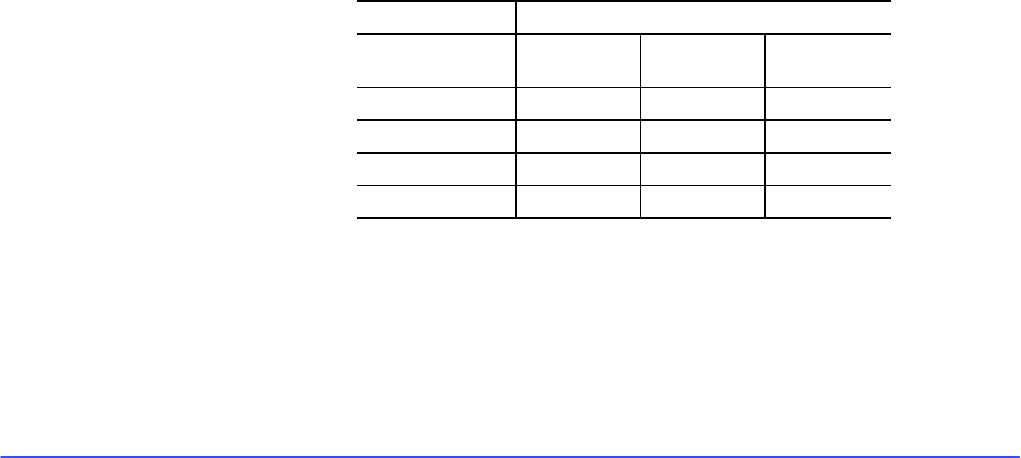
7. Change the high voltage settings so that the densities are within the ranges listed below.
Density Range
Color
Minimum
Density
Target
Density
Maximum
Density
Black 1.40 1.50 1.55
Yellow 0.85 0.95 1.05
Cyan 1.25 1.35 1.40
Magenta 1.30 1.40 1.45
Color Balance
To obtain the best color balance for your system, it is recommended that you generate and
use a Printer Calibration file. The file is used to adjust tone reproduction of your printer and
will compensate for changes in toner characteristics.
Disposal and Recyling
Toners
Never pour toner waste down a drain, pour it on the ground, or in any way release it directly
into the environment.