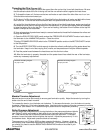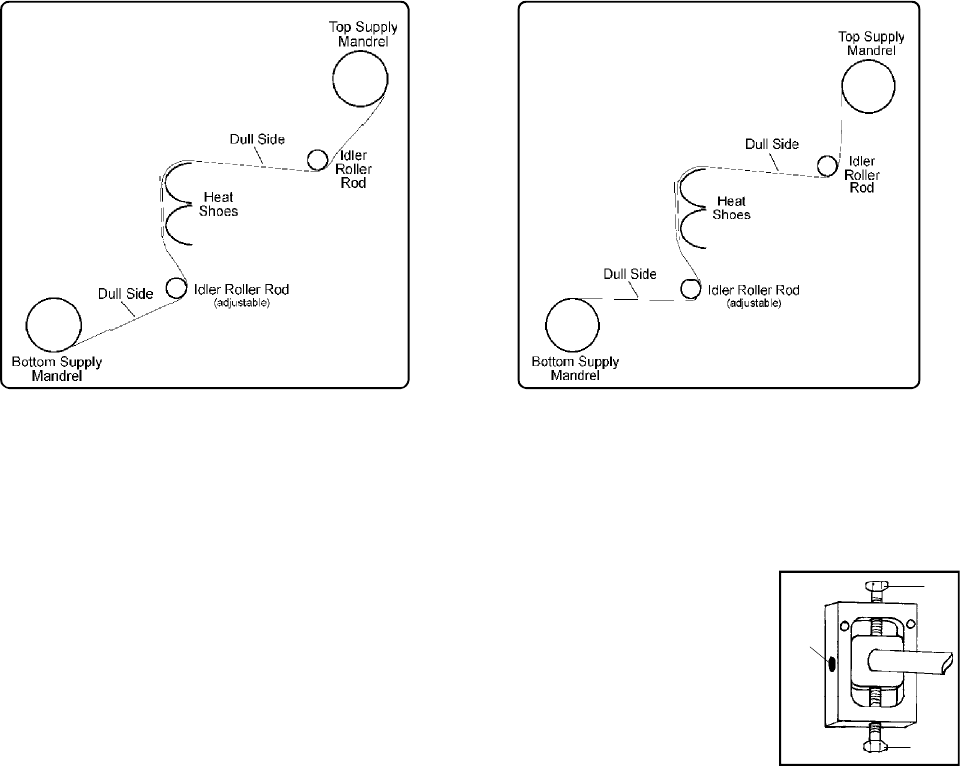
Threading the Film (Figures 1&2)
1. Feed the film from the top roll behind the upper idler roller rod and lay it over both heat shoes. Be sure
that the adhesive side of the film is facing out and the non-adhesive side is against the heat shoes.
2. To thread the lower roll, first remove the two red knobs on each side of the idler slide mechanism.
Slide the idler mechanism toward you.
3. Pull about 4’ of film from the bottom roll. Feed the film from the bottom roll under and behind the lower
idler roller rod. Push the idler slide mechanism back into position and return the red knobs.
4. Lay the film from the lower roll over the film from the top roll and both heat shoes, again ensuring that
the adhesive side of the film is facing away from the heat shoes. If you are cold loading it will be necessary
to tape the bottom film to the top film. If you are hot loading, the bottom film will adhere to the top film
where it overlaps at the heat shoes.
5. Have a large piece of poster board ready to use as a feed card to thread the film between the rollers and
through the laminator.
6. Open the ROLLER RELEASE handle and set the PRESSURE ADJUSTMENT knob on both sides of
the laminator to the LAMINATING position. Close the rollers.
7.Set the FORWARD/REVERSE switch to the FORWARD position and turn the MOTOR ON/OFF switch
to the ON position.
8. Turn the SPEED CONTROL knob far enough to allow the rollers to sufficiently pull the poster board into
the laminator. Keep in mind that varying films, media, and temperatures will require different speeds.
9. Feed the poster board between the heat shoes and into the front rollers.
10. After the laminator is properly threaded and the poster board has exited the rear of the laminator,
make any necessary adjustments.
Mandrel Tension Adjustment:
Mandrel tension must be set correctly to ensure good lamination quality. Adjust the tension by turning the
brake nut at the end of each mandrel.
To increase the tension, turn the brake nut clockwise. To decrease the tension, turn the brake nut counter-
clockwise. Adjust only 1/8 of a turn between tests. Use the minimum amount of tension necessary to achieve
good results. (See Section VIII Troubleshooting for possible tension adjustment problems).
Roller Pressure Adjustment:
You may adjust the roller pressure by turning the bolts on the pressure adjustment blocks
(see Figure 3), which are located on each side of your laminator behind the bottom film
roll. Slide the idler bar out to access the blocks and loosen the set screw. To increase
pressure, loosen the bottom bolt and tighten the top bolt. Adjust the pressure only ¾ of a
turn between tests. Adjust each pressure block as necessary.
The pressure on your Finisher 4300 has been preset at the factory. However, shipping
and handling may necessitate slight pressure adjustment. Once pressure is properly set
you should only need to use the MOUNTING/LAMINATING knobs on the sides of your
Finisher 4300.
BA-FS43 Threading Diagram
for poly-out rolls
Figure 1
Figure 2
4
BA-FS43 Threading Diagram
for poly-in rolls
Figure 3
Set
Screw
Top
Bolt
Bottom
Bolt
abcoffice 800-658-8788 www.abcoffice.com


