


2
3. Place the material to be cut against the paper stop and scales (item 28) at the top of the
trimmer.
4. Determine the amount of material you intend to remove by use of the scales or the
integral board grid lines. (Scales are calibrated in both inch and metric measurements,
grid lines are calibrated in 1 / 2” increments).
5. Hold the material securely in place with your left hand to ensure in remain flat and square
on the trimmer base. On the StakCut Models (715 and 724) the paper is held securely in
place by the clamp. Apply pressure to the clamp handle (item 45) as you follow step six.
Warning – Make sure your fingers are not in the path of the trimmer blade!!!
6. Lower the blade with a firm, steady motion. Continue to lower the blade until the trigger
latch locks. The blade will be secured in position until the next use.
7. For repeat cuts of the same dimension, use the moveable paper stop. (item 30) Move the
stop to the appropriate dimension. Position the left edge of the paper against the stop.
Continue making cuts.
IV. Maintenance
1. Cleaning and Lubrication
To clean your trimmer, wipe it with a towel (or sponge) damp with a mild soap and water
solution (or mild household cleaner).
2. Adjustments
Over a period of years it may be necessary to realign the cutting blade. We suggest you
follow this procedure for realignment. Before any adjustments are attempted, raise the
blade (via the handle) to its full open position.
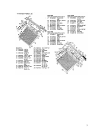
a. At the end of the blade handle is a screw (item 18) and nut (item 19). Insert a
flat blade screwdriver into the screw. Hold the screw in position while you
loosen the nut with a wrench. If your trimmer is folding paper over the bed
blade rather than trimming the paper, turn the screw counterclockwise in 1/8
to 1 / 4” increments, test cutting after each movement. Repeat this procedure
until the blade cuts correctly.
Hold the screw in place and retighten the locking nut. If your trimmer is
pushing or bulging paper back from the edge of the trimmer, follow the
previous procedure, except turn the screw clockwise, test cut, and repeat in
necessary.
b. If neither of the previous procedures realigns the blade, loosen the locking nut
on the screw and turn the screw 2-3 full turns clockwise. Now turn the screw
in 1/8” to 1 / 4” turn increments and test cut until the blade will cut through its
entire length.