


3
Quick Installation Guide
Installation
Warning: Please view the README.TXT file on the Ethernet Adapter
driver diskette for product related information.
Install the driver as described below:
Windows 95
1. Connect the Type-A plug into the USB port on the computer.
2. Insert the Driver Software Diskette.
3. Double-click on My Computer.
4. Double-click on 3-1/2 Floppy (A:).
5. Double-click on Win95/Setup.exe.
6. When prompted, connect the Type-B plug into the adapter.
7. You will observe several loading status windows.
8. If prompted to insert the Windows 95 CD-ROM, do so and
click OK.
9. When prompted to restart the computer, remove the
diskette and click Yes.
Windows 98
1. Connect the Type-A plug into the USB port on the computer.
2. Connect the Type-B plug into the adapter.
3. Connect the adapter to the Ethernet network.
4. The New Hardware Wizard displays.
5. When prompted for the installation medium, check Floppy
Disk Drive and insert the Driver Software Diskette.
6. Follow displayed instructions.
7. You will observe several loading status windows.
8. When prompted to restart the computer, remove the
diskette and click Yes.
When the installation process is complete, remove the diskette
from your drive and follow the instructions for restarting your
PC. After rebooting your system, the USB Ethernet Adapter
will appear to the system as a normal Ethernet network
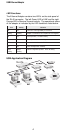
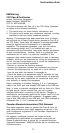
adapter card. For the LED definitions, see "LED functions"
below.
Note: If the Wizard does not appear when you plug in the Ethernet
Adapter, please view the section "Is USB correctly installed" in the
README.TXT file on the Ethernet Adapter driver diskette.
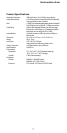
Power Requirements
USB devices can be either self-powered or bus-powered. A
device which has no power connector is bus-powered, and
derives its operating power from the USB connection directly.
The Ethernet Adapter is bus-powered – all you need to do is
plug it into a PC or USB hub (such as Accton’s USB204A).