


3-2
Machine Disassembly and Replacement . . . . . . . . . . . . . . . . . 3-5
Recommended Equipment . . . . . . . . . . . . . . . . . . . . . . . . . . . 3-5
Replacement Requirements . . . . . . . . . . . . . . . . . . . . . . . . . . 3-5
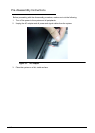
Pre-disassembly Instructions. . . . . . . . . . . . . . . . . . . . . . . . . . 3-6
Disassembly Process . . . . . . . . . . . . . . . . . . . . . . . . . . . . . . . 3-7
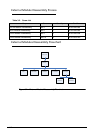
External Module Disassembly Process . . . . . . . . . . . . . . . . . . 3-8
External Modules Disassembly Flowchart. . . . . . . . . . . . . . . . 3-8
Removing the Dummy Card . . . . . . . . . . . . . . . . . . . . . . . . . . 3-9
Removing the HDD Door. . . . . . . . . . . . . . . . . . . . . . . . . . . . . 3-10
Removing the HDD Module. . . . . . . . . . . . . . . . . . . . . . . . . . . 3-11
Removing the DIMM Module . . . . . . . . . . . . . . . . . . . . . . . . . . 3-12
Removing the SSD Module . . . . . . . . . . . . . . . . . . . . . . . . . . . 3-13
Removing the WLAN Module . . . . . . . . . . . . . . . . . . . . . . . . . 3-14
Removing the ODD Module. . . . . . . . . . . . . . . . . . . . . . . . . . . 3-16
Main Unit Disassembly Process . . . . . . . . . . . . . . . . . . . . . . . . 3-19
Main Unit Disassembly Flowchart . . . . . . . . . . . . . . . . . . . . . . 3-19
Removing the Top Case . . . . . . . . . . . . . . . . . . . . . . . . . . . . . 3-20
Removing battery. . . . . . . . . . . . . . . . . . . . . . . . . . . . . . . . . . . 3-26
Removing the Power switch board . . . . . . . . . . . . . . . . . . . . . 3-29
Remove the card reader . . . . . . . . . . . . . . . . . . . . . . . . . . . . . 3-30
Remove the cables from the Mainboard . . . . . . . . . . . . . . . . . 3-31
Removing the Mainboard. . . . . . . . . . . . . . . . . . . . . . . . . . . . . 3-34
Removing the Thermal module . . . . . . . . . . . . . . . . . . . . . . . . 3-36
Removing the Bluetooth Board . . . . . . . . . . . . . . . . . . . . . . . . 3-38
Removing the Speakers . . . . . . . . . . . . . . . . . . . . . . . . . . . . . 3-39
LCD Module Disassembly Process . . . . . . . . . . . . . . . . . . . . . . 3-41
LCD Module Disassembly Flowchart. . . . . . . . . . . . . . . . . . . . 3-41
Removing the LCD Bezel . . . . . . . . . . . . . . . . . . . . . . . . . . . . 3-42
Removing the LCD Panel . . . . . . . . . . . . . . . . . . . . . . . . . . . . 3-46
Removing the Camera Board . . . . . . . . . . . . . . . . . . . . . . . . . 3-48
LCD Reassembly Procedure . . . . . . . . . . . . . . . . . . . . . . . . . . . 3-49
Replacing the Camera. . . . . . . . . . . . . . . . . . . . . . . . . . . . . . . 3-49
Replacing the LCD Panel . . . . . . . . . . . . . . . . . . . . . . . . . . . . 3-50
Replacing the LCD Bezel. . . . . . . . . . . . . . . . . . . . . . . . . . . . . 3-52
Replacing the Bluetooth. . . . . . . . . . . . . . . . . . . . . . . . . . . . . . 3-53
Replacing the Speakers. . . . . . . . . . . . . . . . . . . . . . . . . . . . . . 3-54
Replacing the DC-IN cable . . . . . . . . . . . . . . . . . . . . . . . . . . . 3-56
Replacing the Thermal Module . . . . . . . . . . . . . . . . . . . . . . . . 3-57
Replacing the Mainboard. . . . . . . . . . . . . . . . . . . . . . . . . . . . . 3-59
Replacing the LCD Module & Cables to Mainboard . . . . . . . . 3-60