


2
Federal Communications Commission
( FCC Statement )
This equipment has been tested and found to comply with the limits for a Class B digital device, pursuant to Part
15 of the FCC Rules. These limits are designed to provide reasonable protection against harmful interference in a
residential installation. This equipment generates, uses, and can radiate radio frequency energy, and, if not
installed and used in accordance with the instructions, may cause harmful interference to radio communications.
However, there is no guarantee that interference will not occur in a particular installation. If this equipment does
cause harmful interference to radio or television reception, which can be determined by turning the equipment off
and on, the user is encouraged to try to correct the interference by one or more of the following measures:
n Reorientate or relocate the receiving antenna;
n Increase the separation between the equipment and receiver;
n Connect the equipment with a power socket on a circuit different from that to which the receiver is
connected;
n Consult the dealer or an experienced radio/TV technician for help.
Any changes or modifications not expressly approved by the manufacturers may void the user’s authority to
operate this equipment.
A shielded-
type video signal cable is required in order to meet the FCC emission limits and also
to prevent interference to nearby radio and television reception. It is essential t
hat only the
supplied power cord be used.
Use only shielded cables to connect I/O devices to this equipment.
Canadian DOC Notice
For Class B Computing Devices
This Class B digital apparatus meets all requirements of the Canadian Interference-
Causing
Equipment Regulations.
Cet appareil numérique de la classe B respecte toutes les exigences du Règ
lement sur le matériel
brouilleur du Canada.
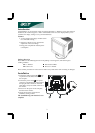
Connecting the Monitor and Swivel Base
1.
Place the monitor with its tube down on a stable
surface.
2. Align the four tabs of the swivel base with the
slots in the bottom of the monitor.
3. Insert the tabs into the slots of the monitor
4. Now slowly slide the swivel base toward the
front of the monitor till you
hear the spring lock
click into place.
Removing the Monitor and Swivel Base
If you need to remove the swivel base, push the spring lock and then pull the swivel base away from the monitor.
NOTE:Special attention should be paid to the control knobs and LED indicators on the front panel
when you place the monitor with its tube down. This will prevent damage to these control knobs and
LED indicators from excessive pressure.