


20
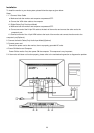
Installation
To install the monitor to your host system, please follow the steps as given below:
Steps
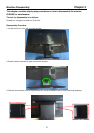
1. 1-1 Connect Video Cable
a. Make sure both the monitor and computer are powered-OFF.
b. Connect the VGA video cable to the computer.
1-2 Digital Cable (Only Dual-Input Model)
a. Make sure both the monitor and computer are powered-OFF.
b. Connect one end of the 24-pin DVI cable to the back of the monitor and connect the other end to the
computer’s port.
1-3 Connect one end of the 19-pin HDMI cable to the back of the monitor and connect the other end to the
computer’s port(Optional).
2. Connect the Audio Cable (Only Audio-Input Model)(Optional)
3. Connect power cord
Connect the power cord to the monitor, then to a properly grounded AC outlet.
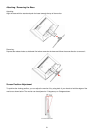
4. Power-ON Monitor and Computer
Power-ON the monitor first, then power-ON the computer. This sequence is very important.
5. If the monitor still does not function properly, please refer to the troubleshooting section to diagnose the problem.