


5
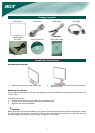
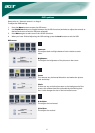
1 Power cord Attach the monitor to the power cord, and then insert the power cord into a
properly grounded electrical socket.
2 VGA cable Connect the signal cable to the VGA input socket of the monitor, and connect the
signal cable to the VGA output socket of the graphics card on the computer. Then
tighten the thumbscrews on the connector.
3 DVI-D cable
(Optional)
Connect the signal cable to the DVI-D input socket of the monitor, and connect the
signal cable to the DVI-D output socket of the graphics card on the computer. Then
tighten the thumbscrews on the connector.
4 Audio cable
(Optional)
Connect the audio input socket (AUDIO IN) of the LCD monitor and the computer
by means of the audio cable.
WARNING!
Check the VGA card of your computer. Make sure the shape of the plug matches the shape of
the socket it is inserted into. Also check that none of the pins are bent or otherwise damaged.
Switching the power
First, switch on the hard-switch on the backside of monitor, then turn on PC and power button on
monitor’s control panel. When you see the LED on the power button go green, this indicates the computer
is ready for use. Allow about 10 seconds for the video signal to appear. If you do not see the green light on
the power button or a video signal, check the connections.
Adjusting display settings
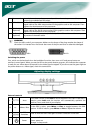
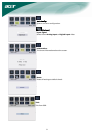
External controls
1
Auto
If the OSD is active, press Auto to exit a selection in the OSD. If the OSD is
inactive, press Auto and the monitor will automatically optimize the
position, focus, and clock of your display.
2/3
</>
Minus / Plus
If the OSD is active, press Minus or Plus to toggle between the OSD
options. If OSD is inactive, press Minus or Plus to adjust the volume.
4
OSD
functions
Press to view the OSD. Press again to enter a selection in the OSD.
5
Power
Power on/off
Green: power on
Orange: in sleep mode
VGA
DVI-D