


© Copyright 2009 Acnodes, Inc.
All rights reserved. Product description and product specifications
are subject to change without notice. For latest product information,
please visit Acnodes’ web site at www.acnodes.com.
PC 5150
15-inch touch panel PC
2
RMC 7155
14” short depth server
661 Brea Canyon Rd., Suite 3
Walnut, CA 91789
tel: 909.598.7388, fax: 909.598.0218, www.acnodes.com
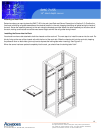
2.4 Installing the System into a Rack
This section provides information on installing the RMC 7152 into a rack. If the system has already been mounted into a
rack, you can skip ahead to Sections 2-5 and 2-6.
There are a variety of rack units on the market, which may mean the assembly procedure will differ slightly. The following is a
guideline for installing the unit into a rack with the rack rails provided with the system. You should also refer to the installation
instructions that came with the rack unit you are using.
Basic Installation Procedure
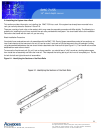
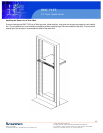
You should have received two rack rail assemblies with the RMC 7152. Each of these assemblies consist of two sections: an
inner fixed chassis rail that secures to the unit (A) and an outer fi xed rack rail (B) that secures to the rail brackets. A sliding
rail guide sandwiched between the two should remain attached to the fixed rack rail (see Figure 2-1). The A and B rails must be
detached from each other to install.
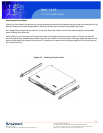
To remove the fixed chassis rail (A), pull it out as far as possible - you should hear a "click" sound as a locking tab emerges
from inside the rail assembly and locks the inner rail. Then depress the locking tab to pull the inner rail completely out. Do this
for both the left and right side rack rail assemblies.
Figure 2-1. Identifying the Sections of the Rack Rails