


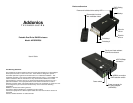

How to Configure Raid
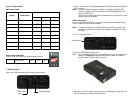
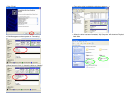
Raid Setting Table
How to Build Raid JBOD
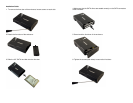
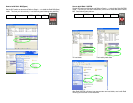
a. Setup Raid mode JBOD using RAID selection switch
b. USB Connection
Plug in mini USB data cable & USB power cable as shown.
c. Plug the other end of the mini USB data cable & USB power cable to USB ports
on your system.
Note: Due to the different layouts of Laptops, we suggest to plug the USB
cables on opposite sides of the Laptops to avoid weak power from the
same side USB ports.
Avoid using the front USB ports of desktop because, sometimes, it is too
weak to give enough power.
eSATA Connection
If you are connecting via eSATA, you will have to connect the USB power cable
or the 110/220V AC/DC 5V power adapter.
Note: To see 2 individual drives (JBOD single) using eSATA connection, the
enclosure must be connected to a port multiplier compatible SATA host
controller.
d. Turn on the power switch.
e. Press the “RAID Setting” button once.
Note: Since the default Raid mode may be different from your new Raid mode
setting, it is required to press the “RAID Setting” button once before
using Portable Dual Drive RAID enclosure.
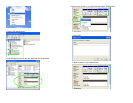
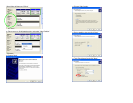
f. Place the cursor on the My Computer icon on your desktop, do a right click and
choose “Manage” by clicking mouse left button
RAID Selection Switch
Display RAID Status
4 2 1
0 BIG (span) OFF OFF OFF
1 JBOD (single) OFF OFF ON
2 FAST (strip) OFF ON OFF
3 SAFE (mirror) OFF ON ON
4 SAFE33 ON OFF OFF
5 SAFE50 ON OFF ON
6 RESERVED ON ON OFF
7 GUI ONLY ON ON ON
1
JBOD (single)
OFF
OFF
ON
USB Data Cable
USB Power
Cable
Power Switch