


Installation (RAID)
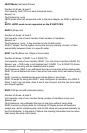
The Cipher hardware prevents the use of software to configure or manage the
Port Multiplier. Configuring a RAID mode must be done using the dipswitches
and SET button on the port multiplier itself, located inside the unit at the rear of
the chassis.
Installation
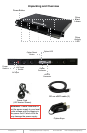
1. Use the provided key to unlock the front door if needed and open it.
2. Insert a drive into each bay as desired, SATA connectors first, label side up
as shown, then press the drive firmly into place.
3. Connect the Host eSATA cable to a computer. If desired, connect an exter-
nal eSATA drive to the Drive eSATA connector.
4. Make sure the AC input switch is set correctly, then connect the power cord
to an AC outlet.
5. Insert the Cipher Key into the Cipher
Keyhole.
6. Set the AC power switch on the rear to
ON, then press the power button
behind the front door to turn on the unit.
7. After the unit has been powered up, the
Cipher Key may be removed.
To remove a drive, pull the Eject Lever until
the drive disengages from the internal
connector then pull the drive out.
Port Multiplier Modes
The Port Multiplier supports several types of RAID and some non-RAID drive
sets. Each configuration has different properties and requirements, as follows:
www.addonics.com Technical Support (M-F 8:30am - 6:00pm PST) Phone: 408-453-6212 Email: www.addonics.com/support/query/
Dipswitch
SET Button