


www.addonics.com Technical Support (M-F 8:30am - 6:00pm PST) Phone: 408-453-6212 Email: www.addonics.com/support/query/
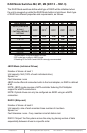
Resetting the RAID Mode
NOTE: This procedure destroys all RAID data. It should not harm individual
drives or their contents; however, creating or running backups of all data is
strongly recommended before proceeding.
1. Power down the unit and set the dip switch to the factory default
setting (all switches OFF).
2. While holding the SET button with a ballpoint pen, turn the unit on. A
long beep will sound from the Port Multiplier. The SET button may be released
once the long beep stops.
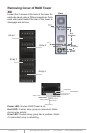
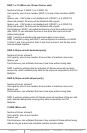
Insert Hard Drives
with top facing
right
Drive Power &
Activity LED
for each Drive Bay
Door Lock
Individual
Drive Bay
Door
Installing drives into the
RAID Tower XIII
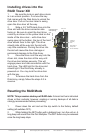
1. Be sure the lock on each drive doors
is in an unlock position. If not use the key
that comes with the Disk Array to unlock the
drive door. Pull on the door lever to swing
open the drive door all the way.
2. Slide a 3.5” SATA hard drive into the
drive slot with the drive connector side
facing in. Be sure to orient the hard drive
correctly as shown in the yellow label on the
inside of the drive door – with drive door
swing open at the bottom, the top of the hard
drive should face to the right. The drive
should slide all the way into the slot with
very little resistance. Forcing the drive into
the slot will cause the drive damage or
permanent damage to the Disk Array.
3. Once the drive is all the way into the
driver slot, close the door all the way until
the drive door latches securely. This will
engage power and data connection with the
hard drive. The LED light for the drive slot
should light if the Disk Array already is
powered on. You may lock the drive door
with the key.
4. To remove the hard drive from the
Disk Array, simply follow the steps 2-3 in
reverse.