


2
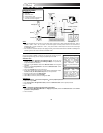
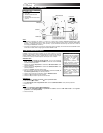
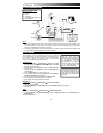
REAR PANEL FEATURES
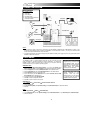
1. POWER IN – Use the included power adapter
to connect the MultiMix 4 USB to a power
outlet. While the power is switched off, plug
the power supply into the MultiMix 4 USB first,
then plug the power supply into a power
outlet.
2. POWER SWITCH – Turns the MultiMix 4 USB on and off. Turn on the MultiMix 4 USB after all input
devices have been connected and before you turn on amplifiers. Turn off amplifiers before you turn off
the MultiMix 4 USB.
3. USB PORT – Use the included cable to connect the MultiMix 4 USB to a computer. MultiMix 4 USB
requires a USB 1.1 or higher (e.g. USB 2.0) connection.
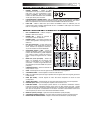
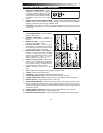
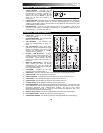
TOP PANEL FEATURES
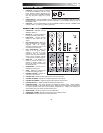
1. POWER LED – Illuminates when the
MultiMix 4 USB is on.
2. MIC INPUT – Connect a microphone
to these inputs with an XLR cable.
3. LINE INPUT – Connect line-level
devices to these inputs with 1/4"
cables.
4. HPF (High-Pass Filter) – When this
button is depressed, the channel's
high-pass filter will engage,
eliminating frequencies below 75 Hz
to reduce any low-level noise.
5. GTR / LINE SWITCH – When this
switch is in the down position,
Channel 1 will serve as a high-
impedance input for connecting
guitar or bass instruments. When the
switch is in the up position, Channel
1 will accept mic or line-level signals.
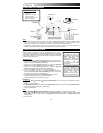
6. MAIN OUT – Use standard 1/4"
cables to connect this output to a
speaker or amplifier system. The
level of this output is controlled by
the MAIN VOL knob.
7. HEADPHONES – Connect your ¼”
headphones to this output.
8. GAIN – Adjusts the channel audio
pre-fader and pre-EQ gain level.
9. CHANNEL VOLUME – Adjusts the
audio level on the channel.
10. CHANNEL PAN – Adjusts the left-to-right balance of the channel's audio.
11. CHANNEL EQ (BASS) – Adjusts the low (bass) frequencies of the channel.
12. CHANNEL EQ (TREBLE) – Adjusts the high (treble) frequencies of the channel.
13. BALANCE (CH 3 & 4) – Adjusts the balance between Channels 3 and 4.
14. PHANTOM POWER – This switch activates and deactivates phantom power. When activated,
phantom power supplies +48V to both XLR mic inputs. Please note that most dynamic microphones do
not require phantom power, while most condenser microphones do. Consult your microphone’s
documentation to find out whether it needs phantom power.
15. MAIN VOLUME – Adjusts the output volume of the MAIN OUT.
16. HEADPHONE VOLUME – Adjusts the volume level of the headphone output.
17. LED METERS – Monitors the audio level of the MAIN OUT.
1
7
2
3
8
4
2
3
8
10
11
12
9
10 13
14
15
16
17
11
12
99
4
3
3
6
6
5
3 2 1