


6 AT-9800 Series Switch
C613-04043-01 REV D
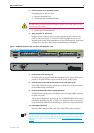
RX and TX terminal locations on SC fibre GBIC ports are the reverse of RX and TX
terminal locations on fixed SC fibre ports. When looking at an SC fibre GBIC from the
front, the RX terminal is on the left and the TX terminal is on the right.
11. Connect the data cables
Make sure each cable connection is secure. The switch will now perform
basic Layer 2 switching functions.
Configuring the Switch
Some configuration is necessary if you wish to enable the switch’s advanced
switching capabilities. The switch can be configured via the Command Line
Interface (CLI) or Graphical User Interface (GUI).
Using the CLI to configure a switch
1. Connect a terminal or PC to ASYN0 (RS-232)
Using the supplied RJ-45 to DB9F cable, connect your terminal or PC to the
ASYN0 port on the switch’s front panel.
2. Set the communication parameters
Set the communication parameters on your terminal or terminal emulation
program to:
• Baud rate: 9600
• Data bits: 8
•Parity: None
•Stop bits: 1
• Flow control: Hardware
3. Check the power supply
Ensure that the On/Off switch is in the On position and that the switch is
receiving power (PWR LED lights green).
4. Log in
After the switch has booted, the log in prompt appears. If the log in prompt
doesn’t appear, press [Enter] two or three times.
When the switch boots for the first time it automatically creates an account
with manager privileges. The account has the log in name “manager” and
the password is “friend”.
At the log in prompt, enter the log in name and password.
Login: manager
Password: friend
The switch’s command prompt appears and you can now configure the
switch using the command line interface.
Change the password as soon as possible. Leaving the manager account with
the default password is a serious security risk. Make sure you remember the
new password as there is no way to retrieve it if it is lost.