


6 Port Interface Card
7. Unpack the PIC.
In an antistatic environment, remove the PIC from its packing material. Be sure
to observe ESD precautions.
Warning Do not attempt to install a PIC or any other expansion option
without observing correct antistatic procedures. Failure to do so may damage
the switch or router, PIC, or expansion option. If you are unsure what the
correct procedures are, contact your authorised Allied Telesis distributor or
reseller.
8. If the PIC has jumpers, check they are correctly set.
Warning Do not attempt to change any jumpers, DIP switches, or other
hardware configurations while the switch or router is connected to a power
supply, redundant power supply, or a ‘live’ network. Dangerous voltages may be
present on some parts of the board, even if the switch or router is turned off.
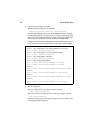
AT-AR020 PRI E1/T1 and AT-AR021(S) BRI-S/T PICs have user-configurable
jumpers. Check all jumpers are set correctly on the new PIC, as shown in
Table 1 and Ta bl e 2. Early versions of the AT-AR020 PIC also have a J3 interface
jumper. If present, this jumper must be installed for E1 mode and removed for
T1 mode. The AT-AR021(S) V2 hardware revision, identified by the label
“AR021 V2” on the board, supports both TE and NT mode. Jumper J4, when
installed, selects NT mode. The PIC should be configured as a TE for normal
operation.
Table 1: Functions of jumpers on the AT-AR020 PRI E1/T1 PIC board
Jumper Function Default
J1 ISDN NT mode (installed, test only) or
TE mode (not installed).
Not installed.
J2 T1 mode (installed) or E1 mode (not installed). Installed.
J3 E1 mode (installed) or T1 mode (not installed).
Only present on earlier versions of the PIC.
-
Table 2: Functions of jumpers on the AT-AR021(S) BRI S/T PIC board
Jumper Function Default
J1 100Ω termination for TX. Not installed.
J2 100Ω termination for RX. Not installed.
J4 ISDN NT mode (installed) or TE mode (not
installed). Only present on V2 hardware revision
of PIC.
Not installed.