


Chapter 5 : FRONT PANEL DISPLAY MENUS DESCRIPTION (continued) OCTO² / QFX402
PAGE 30
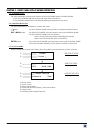
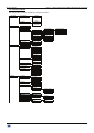
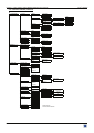
• If the selected input type is a COMPUTER signal the IMAGE MENU displays:
4-1 [Centering] + ENTER.
Adjust automatically the image in the centering pattern.
4-2 [Pos. settings] + ENTER.
Select one of the following functions with + ENTER.
4-2-1 [H position] + ENTER.
Adjust the Horizontal position with + ENTER.
4-2-2 [V position] + ENTER.
Adjust the Vertical position with + ENTER.
4-2-3 [H size] + ENTER.
Adjust the Horizontal size with + ENTER.
4-2-4 [V size] + ENTER.
Adjust the Vertical size with + ENTER.
4-3 [Aspect in] + ENTER.
Select the Aspect Ratio of your input source with + ENTER.
• [4/3 standard]: 4/3 input format.
• [16/9 letterbox]: Letterbox input format.
• [WS anamorphic]: Widescreen Anamorphic input format (video) or 16/9 input format (computer).
4-4 [Aspect out] + ENTER.
Select one of the following output aspect ratio with + ENTER.
• [Standard]: The entire image and the aspect ratio are preserved.
• [Crop]: The image is zoomed without deformation to fill the screen, but some borders of the image will
be cropped. The aspect ratio is preserved.
• [Full Screen]: The image is stretched to fill the screen. The aspect ratio is not preserved.
• [Zoom]: The image can be zoomed, cropped and stretched at your convenience.
4-5 [Black level] + ENTER.
Adjust the black level with
+ ENTER.
4-6 [Color] + ENTER.
Select a color (Red, Green, or Bleu) with + ENTER and adjust the level with + ENTER.
4-7 [Optimize] + ENTER.
Select an item with + ENTER.
• [Clock]: Manual adjustment of the pixel clock.
• [Phase]: Manual adjustment of the pixel phase.
4-8 [Preset] + ENTER.
This function allows setting all the image parameters to the factory settings. Select [YES] and validate with
ENTER.
NOTE
: If the selected input is the reference computer input, the available adjustments are: Black level & Color.