


073-1316 Rev. B 9
© 2010 Apple Inc. All rights reserved.
computer. Select “On” and click Continue.
6. If the network is password protected, you be asked for a password when you select it. Type
the password and click Continue.
7. An Apple ID screen appears. This is used to purchase content from the iTunes store. You can
use MobileMe or .Mac usernames here as well. When complete, click Continue.
8. If you do not have an Apple ID or MobileMe account, click Continue to move to the next
screen.
9. A Registration Information screen appears. You are not required to ll this out, but it is
helpful if you do. When complete, click Continue and your product registration will be sent
immediately.
10. If Mac OS X servers are available on your network, you’ll be asked if you’d like to log on to
them. If not, click Continue.
11. A Create Your Account screen appears. This will be used to create a User Account with Login
ID and Password for you computer. You should remember this password. You’ll be asked for
it when you install new software or perform other administrative tasks on your computer.
When complete, click Continue and your account will be created immediately.
12. A screen to select your user picture appears. Take a snapshot with the built-in camera or
select a picture from your Library. When complete, click Continue.
13. A MobileMe screen appears. Select an option and click Continue.
14. A Thank You screen appears. Click Go to complete the Mac OS X Setup Assistant.
15. Eject the Mac OS X Install DVD by dragging its icon to the Trash.
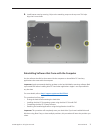
Part Four: Restoring the bundled applications
1. To install the bundled applications, locate the Applications Install Disc that came with your
computer.
Note: You may see a Software Update icon bouncing up and down in your dock. You can
quit this for now.
2. Insert the Applications Install Disc into the optical drive.
3. The disc will mount and an Applications Install Disk dialog appears. Double-click on Install
Bundled Software to install your iLife applications.
4. A dialog appears asking if you want to run the package. Click Continue.
5. The Bundled Software Applications Installer screen appears. Click Continue.
6. A software license screen appears. Click Continue, then click Agree to accept the terms.
7. A select destination dialog appears. Make sure the partition with the green arrow is the
correct destination, then click Continue.
8. To install all the bundled applications, click Install.
9. To select individual applications, click Customize. Click the disclosure triangle next to