


Xserve, Xserve G5, Xserve RAID Hard Drive -
3
Installing the Replacement Hard Drive
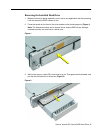
1. Press the handle on the front of the replacement drive module so that the handle pops
out.
2. Place your fingers on the center of the drive faceplate directly below the handle. Push
the drive into the empty bay until its connector clicks into place.
3. Press in the handle on the drive module so that it is flush with the front panel.
4. Wait for the upper or right LED to turn green, indicating normal operation.
Apple Computer, Inc.
© 2004 Apple Computer, Inc. All rights reserved.
This document is protected under U.S. Copyright Law and International Treaties, and no
part of this document may be reproduced in any form without written permission from
Apple.
Apple is not responsible for typographical, printing, or inadvertent errors.
Apple Computer, Inc.
1 Infinite Loop
Cupertino, CA 95014-2084
USA
+ 1 408 996 1010
http://www.apple.com
Apple, the Apple logo, Mac, Macintosh, and the Mac logo are trademarks of Apple
Computer, Inc., registered in the U.S. and other countries. Xserve is a trademark of Apple
Computer, Inc.