


Power Mac G4 SCSI Hard Drive -
2
Important:
To avoid electrostatic discharge, always ground yourself by touching the
port access covers before you touch any parts or install any components inside the
computer. To avoid static electricity building back up in your body, do not walk
around the room until you have completed your installation and closed the computer.
7. Unplug the power cord.
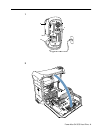
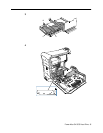
8. Lift the latch on the right side access panel.
(Figure 1B)
9. Gently lower the access panel until it lies flat. To avoid scratching the case, lower the
panel onto a soft, clean cloth.
(Figure 2)
Warning: If you see any lights glowing on the main logic board, the computer
has not been shut down. Close the side access panel and shut down the
computer before proceeding.
Removing the Installed Drive
1. Disconnect the power cable
(Figure 3A)
from the SCSI hard drive.
2 Using a flat screwdriver, pry the SCSI cable terminator
(Figure 3B)
from the drive.
Note:
The terminator is in a black holder attached to the drive with tape. Pry the
terminator up carefully, making sure the tape remains on the holder. You’ll use this
tape to stick the terminator to the new drive.
3. Disconnect the SCSI ribbon cable
(Figure 3C)
from the hard drive.
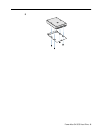
4. Using a Phillips screwdriver, remove the drive carrier mounting screw.
(Figure 4)
5. Tilt the drive carrier and carefully remove the drive from the computer.
6. Remove the four screws from the underside of the carrier and remove the drive from
the carrier.
(Figure 5)
Installing the Replacement Drive
1. Position the replacement drive on the drive carrier so that the ribbon cable and power
cable connectors align with the end of the carrier that will be mounted to the chassis
(the end with the screw hole).
2. Attach the carrier to the underside of the drive with the four screws you removed from
the original drive.
3. Align the tabs on the rear of the carrier with the slots in the computer chassis and slide
the carrier in.
4. Replace the carrier’s mounting screw and tighten it to reattach the carrier to the
chassis.
5. Reconnect the SCSI ribbon cable and P5 power cable to the drive.
6. Reattach the SCSI cable terminator to the top of the drive.