


English
24 All-in-one PC ET2700 Series
Using the On Screen Display (OSD) Menu
The On Screen Display (OSD) menu appears if you:
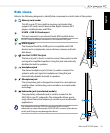
• press the MENU button in the front panel; or
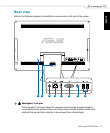
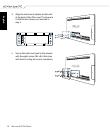
• connect the HDMI or VGA cable to the rear HDMI-input or Display-input port.
OSD function instruction
To display the OSD menu, press the MENU button on the front panel. To navigate through the
OSD functions or modify OSD settings, press the Volume Increase ( ) / Decrease ( ) keys.
To activate the selected function, press the MENU button.
1. Panel Off
This function allows you to turn off the display panel of the All-in-one PC on. Press the MENU
button to activate this function.
2. Color
• Brightness: The adjusting range is from 0 to 100.
• Contrast: The adjusting range is from 0 to 100.
• Color Temp.: Contains four color modes including Cool, Normal, Warm, and User mode.
3. Image
• Sharpness: The adjusting range is from 0 to 100.
• Aspect Control: Adjusts the aspect ratio to “Full” or “OverScan”. This function is configurable
only when you use the All-in-one PC as a standard desktop LCD monitor.
• Auto Adjust: Adjusts the horizontal position (H-Position) and the vertical position (V-
Position) of the image. This function is configurable only when you use the All-in-one PC as
a standard desktop LCD monitor and set the Display-input port as the input source.
4. Input Select
• PC: Sets the All-in-one PC as the display signal source.
• HDMI: Sets the HDMI-input port as the display signal source.
• VGA: Sets the Display-input port as the display signal source.
• HDMI with Device Share*: Sets the HDMI-input port as the display signal source and
enable the Device Share function.
• VGA with Device Share*: Sets the Display-input port as the display signal source and
enable the Device Share function.
The HDMI with Device Share and VGA with Device Share items appear only when you enable
the Device Share function under the System Setup OSD menu and replace the HDMI and
VGA items.