


3
ASUS Xonar DX Quick Installation Guide
English
3
3
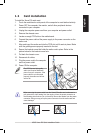
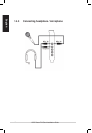
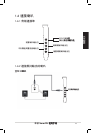
1.2 Card installation
To install the Xonar DX audio card:
1. Touch the metal back or side panel of the computer to avoid static electricity.
2. Power OFF the computer, the monitor, and all other peripheral devices
connected to your computer.
3. Unplug the computer power cord from your computer and power outlet.
4. Remove the chassis cover.
5. Locate an empty PCIE slot on the motherboard.
6. Connect the power cable of the power supply to the power connector on the
audio card.
7. Align and insert the audio card into the PCIE slot until it seats in place. Make
surethegoldngersareproperlyinsertedtotheslot.
8. Secure the bracket screw that holds the audio card in place. Refer to the
picture below for the bracket screw hole.
9. Put back the chassis cover.
10. Reconnect all cables.
11. Plug the power cord to the computer
and to a power outlet.
12. Power ON the computer.
The PCI Express high-quality
audio card requires additional
power from your computer. If the
power cable is not connected
properly, the audio card will not
work at all.
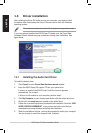
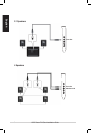
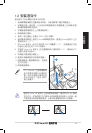
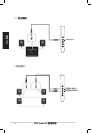
When removing the power cable from the Xonar DX audio card, make sure to
pulloutwardthe4-pinheaderrst,thenunplugitfromthepowerconnectoras
the following pictures show. Do not forcefully remove the header from the power
connector; doing so may pull up the power connector from the audio card and
cause damage!