


Chapter 2. Hardware Setup
13
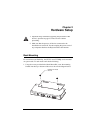
Setting Up
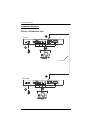
Setting up the CE770 USB KVM Extender system is simply a matter of
plugging in the cables. Make sure that all the equipment to be connected up is
powered Off. Refer to the installation diagram on the following page and do the
following:
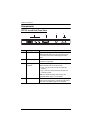
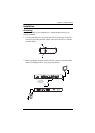
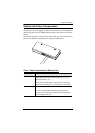
1. Plug the cables from the local console devices (mouse, keyboard, monitor,
microphone, speakers) into their ports on the Console section on the rear
of the Local Unit (CE770L). Each port is marked with an appropriate icon
to indicate itself.
2. Plug the appropriate connectors on the USB KVM cable supplied with this
unit into their ports on the CPU section on the front of the Local Unit
(CE770L).
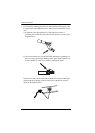
3. Plug the connectors on the other end of the USB KVM cable into the
appropriate ports on the local computer. Each connector is marked with an
appropriate icon to indicate which it is.
Note: If you are combining the CE770 with a KVM switch, the other end
of the USB KVM cable plugs into the appropriate ports on the KVM
switch.
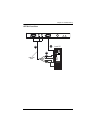
4. For control of serial devices, connect the RS-232 serial port on the local
unit to a serial port on the local computer.
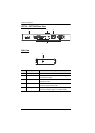
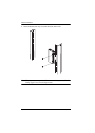
5. Plug either end of the Cat 5e cable into the CE770L's Remote I/O port.
Plug the other end of the Cat 5e cable into the I/O port of the Remote Unit
(CE770RQ).
6. Plug one of the power adapters (supplied with this package) into an AC
source; plug the adapter's power cable into the CE770L's Power Jack.
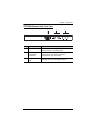
7. Plug the cables from the remote console devices (mouse, keyboard,
monitor, speakers, microphone), into their ports on the Console side of the
CE770RQ.
8. Plug the second power adapter (supplied with this package) into an AC
source; plug the adapter's power cable into the CE770RQ's Power Jack.
Note: Hot-plugging the cat5 cable will automatically trigger the deskew
function.