


ENGLISH
20
1.5 Cabling
Follow these steps for a trouble-free start of the print server
operations with your print server.
1. Confirm proper operation of the printer to be connected
to the print server.
2. When you have confirmed proper operation of the printer,
turn off its power.
3. Confirm that your network is operating normally.
4. Connect the print server to the network (through the RJ-
45 connector of the print server).
Configuration problems may result if the
print server is powered up without first
establishing its network connection.
Please follow this procedure to avoid
complications at the configuration
stage.
5. While the printer is powered off, plug the print server to
the printer (parallel or USB interface).
6. Turn on the printer’s power.
7. Connect the DC end of the AC Power adapter to the DC
power input socket of the print server and the AC end to
the wall outlet. This will supply power to the print server
immediately.
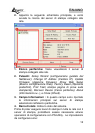
Your print server is built with a default
IP Address. To prevent from any
conflict in your network, it is
recommended to use the PS-Utility
program to change the IP setting when
there is some other device’s IP Address
is the same as the print server’s default
IP Address.