


AS PRG-1000
AUTOSTART TECH TOOL
9. READ BUTTON
The “READ” button displays the remote starter’s information and allows modification
of its options.
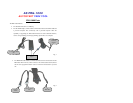
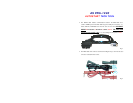
Please use the proper cable (see Fig. 2).
1. Press “READ” and select one of the brand names displayed on the PRG-1000. If
the unit is not compatible, the PRG-1000 will display a “PRODUCT VERSION
NOT SUPPORTED” message that prompts you to “Upgrade Programmer With
PC Interface”. When the unit is compatible, the PRG-1000 displays the unit’s
model number and software version.
2. Select the programming “Mode” you wish to access by scrolling “UP” or
“DOWN” and pressing “ENTER”. You can always return to the previous menu
by pressing “EXIT”.
3. Select the programming “Function” you wish to access by scrolling “UP” or
“DOWN” and pressing “ENTER”. You can always return to the previous menu
by pressing “EXIT”.
4. Select the programming “Option” you wish to change by scrolling “UP” or
“DOWN” and pressing “ENTER”.
5. At that moment you can either immediately save the newly entered setting by
pressing “ENTER” followed by “WRITE”, or wait until all changes are made
and then press “WRITE” to save the new settings all at once to the remote
starter.
6. Press “SAVE” to save the new settings to the PRG-1000 file.
Warning: Modifications made to the customizable options will apply solely when writing to the remote
starter EEPROM is completed. Never disconnect the AS PRG-1000 during the writing process. Cable
disconnection may lead to remote starter EPROM corruption.
AS PRG-1000
AUTOSTART TECH TOOL
7. DIAGNOSTIC BUTTON
The “DIAG” button is used to troubleshoot units. It offers 3 options:
Please use the proper cable ( see Fig. 2).
1. “START FAILURE” displays the last recorded remote start failure.
2. “LAST ALARM” displays the last event that generated a full alarm trigger.
3. “ERASE START FAILURE” deletes the last stored remote start failure.
8. FUNCTION BUTTON
The “FUNCT” button is used to reset a unit to its factory settings, or to erase all of the
installer’s programming files.
Please use the proper cable( see Fig. 2).
1. “RESET STARTER” clears all previous settings, events loggings, tachometer
references and transmitter codes stored in the unit, and resets them to the factory
settings. After selecting “RESET STARTER”, you are prompted to confirm your
choice by pressing “ENTER”. If you do not wish to reset the unit completely,
press “EXIT” to go back to the preceding menu.
2. “RESET PRG-1000” erases all of the installer’s programming files at once.
After selecting “RESET PRG-1000”, you are asked to confirm your choice by
pressing “ENTER”. If you do not wish to reset the programmer’s files
completely, press “EXIT” to go back to the preceding menu.