


Hardware Installation
Follow these steps to connect the AXIS 1440 to the printer and your
network.
1. Locate the serial number on the bottom of the AXIS 1440 and
write it down. You need this number during configuration.
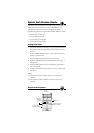
2. Turn the printer off and connect the AXIS 1440 to the printer’s
parallel port.
3. Connect the AXIS 1440 to the network using a twisted pair
(10BaseT) cable.
4.
Turn the printer on and connect the external power supply to the
AXIS 1440. Check to make sure the network indicator is flashing
.
5. Press the test button to print a test page. If the test page prints
successfully, the AXIS 1440 is connected correctly to the printer.
Software Installation
AXIS Utilities disks 1 and 2 contain the following:
•AXIS NetPilot
™
• AXIS Print Utility for Windows (Windows 3.1 and Windows
for Workgroups)
• AXIS Print Monitor (Windows 95, Windows 98, and
Windows NT)
• AXIS MIB (Management Information Base)
• AXIS Print Utility for OS/2
• axinstall script (UNIX)
You install different programs, depending upon your network needs.
For example, you must install AXIS Print Monitor and/or AXIS
Print Utility for Windows if you have a NetBIOS/NetBEUI
network. You’ll probably want to install AXIS NetPilot if you have a
NetWare network. See the AXIS 1440 User’s Manual for more
information.
Notes:
❏ Install your EPSON printer software and connect the AXIS
1440 to your printer and network before you begin this
procedure
.
❏ Close all applications before you begin this procedure.